
NEVER SAY “NEVER”!
Greetings fellow soap enthusiasts! Have you ever seen a picture of a handmade soap so outrageously beautiful and skillfully crafted it made you instantly think, “Holy moly! I’ll never be able to make something like that!”? Or, “I’ll never be good enough to pull that off!”? If you have, you’re not alone in those occasional thoughts of self-doubt; It’s natural for many artists to feel that way from time to time. Heck, I get those self-doubting thoughts often myself, but the best way I’ve personally found to overcome them, and to prove myself wrong (Sometimes!) is to just dive in and give it a try!
Many times, it’s also extremely helpful to reach out to your fellow soap makers, and those who inspire you, via different crafting groups on social media. You’ll be surprised by the number of incredible soap makers who are more than happy to lend a helping hand; and I’ve found this to be the case way more often than not! And then, of course, there’s always blogs and various YouTube channels too. Blogs and videos are excellent resources for soap makers of all experience levels, making it possible to see virtually any soap making recipe, design, and/or technique in action!
But what does all this have to do with the soap project highlighted in this week’s blog? Well, it just so happens to be a design-technique that I once told myself I’d never be able to do! As the title of this blog gives away, we’ll be creating a beautiful ombré effect in cold process soap. The very first time I saw a picture of a perfectly-executed, drop-dead gorgeous ombré-style handmade soap, where that stunning gradient of color stretched through each bar virtually seamlessly, two thoughts popped into my mind simultaneously. The first was, “Wow! That must be so difficult to make.”, and the second was, “Yup! There’s no way I’ll ever be able to do that!”.
However, with a bit of practice and a lot of YouTube tutorials along the way (My favorite being from the wonderful and incredibly talented Lisa from “I Dream in Soap”; a highly recommended watch!), I was able to get this stunning and fun design-technique “mastered”, albeit, not exactly perfect, but enough to have me feeling pretty darn proud of myself, and happy with my outcomes! In putting into practice that which I told myself I couldn’t do, I learned something very important along the way... I learned that just because something looks difficult doesn’t necessarily mean it actually is! Is this design-technique a little tedious and/or a tad time-consuming? It can be. But is it difficult? Definitely not! In fact, I truly feel creating a smooth, flowing, lovely, ombré-style color-gradient in one’s handmade soaps is something any soap maker can do! Whether you’re at the beginning of your soap making journey, or you’re well on your way, you can do this! With that said, I’d be delighted if you’d join me in the making of “Apricot Sunrise” ombré soap!
SUNRISES AND APRICOTS
The inspiration for this soap design began with a fragrance oil. Nurture Soap’s “Juicy Apricot” fragrance oil, to be precise! I remember the first time I smelled this fragrance like it was yesterday. A dear friend of mine had received a sample bottle of it in an order, and upon immediately falling in love with it, had ordered a bigger size. She sent me the sample bottle so we could gush about it together, since gushing is way more fun when you can do it with a friend! As expected, it was love at first sniff for me too! “Juicy Apricot” fragrance oil lives up to its name to the letter... It’s the happiest, juiciest, most well-rounded, authentic, mouthwatering apricot aroma I’ve ever smelled! I didn’t waste a moment getting that sample bottle added to a 16oz test batch!
What resulted was pure apricot bliss! Like many stone fruit fragrances often do, I did notice my test batch seemed to lose some of its initial potency and “juicy character” during the very beginning of cure, but three weeks later, its full aromatic bouquet returned like crazy, and I was left having to remind myself that I couldn’t nibble on the bars! Its scent potency and retention turned out being fantastic, as the very last bar from that test batch, used almost a year later, smelled just as true and delicious as the previous bars had! Working with “Juicy Apricot” fragrance oil had been a breeze as well; I didn’t experience any kind of acceleration, ricing or discoloration with it.
It was (And is!) an all-around perfect fragrance oil, and it just so happens to be perfect for this project too (Yes, I’ve bought more!). Not only does its aroma just make me feel sublimely happy whenever I smell it, reminding me of a cheerfully fresh, energizing, orchard sunrise, but its perfect behavior in cold process soap makes this particular design-technique easily doable. To create a seamless ombré effect in cold process soap, you really need your soap batter to stay as fluid and as manageable as possible, from the beginning of pour to the end of it, so creating a sunrise-inspired ombré effect with Nurture Soap’s “Juicy Apricot” fragrance oil is an excellent option!
This soap project features an optional piped-top, which includes soap frosting and decorative embeds made with Nurture Soap’s Low Sweat, Clear Soap Base. Please note that “optional” is always the key word here, so if you’d prefer to omit that part of the project, that’s no problem at all! For those who would like to include the soap frosting portion of this project, please feel free to use the soap frosting recipe listed below, if you’d like! If you wish to include the decorative embeds also, the first thing to do will be to get those made and ready to rock!
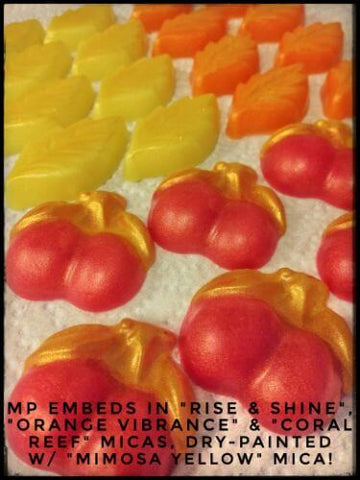
I’m a fan of the always inexpensive Life of The Party-brand molds, which you can find at many online bakery supply shops for about $2 per mold (Check out my favorite mold retailer, Sweet Treat Supply, if you’re looking for a great place to start that won’t break the bank!). For my decorative embeds, I chose to create little apricots in “Coral Reef” mica (A jaw-dropping color!), as well as some pretty leaf embeds in “Rise & Shine” and “Orange Vibrance” micas. Once unmolded, I used “Mimosa Yellow” mica to dry-paint a bit of detail on each one. As always though, you’re completely free to incorporate any type of decorative embellishment which might strike your fancy better. Your unique artistry knows no boundaries or limitations; have fun with this, and get creative any which way you’d like!
To go with the sunrise theme of this ombré-style soap project, I decided to choose mica colors that would look just as beautiful on their own as they would when mixed together within the soap batch. An ombré soap design is one in which one color, or shade, gradually “transforms” into another within the finished bars of soap. What this essentially means is that the color in the center of the gradient will be a blend of the colors you’ve chosen. White is always a popular choice when it comes to creating an ombré effect in soap because the addition of it simply makes whatever color you’ve chosen to begin with increasingly lighter and lighter as it gradually moves up and/or across your soap bars.
You’re not limited to using a single-color fading to white if you don’t want to though. While I do recommend keeping your color-gradient simple, you can certainly use as many colors as you’d like with this technique! Another recommendation is to choose colors that won’t create an unappealing shade when mixed together. Purple fading into green, for example, probably wouldn’t make for a very pretty color combination in an ombré soap design, but any of the Primary colors paired together would. For this particular project, I chose to pair the deep, stunning, coral-like red shade of “Wanderlust” mica with the always classic, sunshiny-yellow shade of “Firefly” mica. Together, these two outstanding mica colors will create a gradient of sherbet-like orange within the soap, to depict the colors of a beautiful sunrise. For the optional soap frosting portion of the project, I chose “Rise & Sine” mica for its cheerful shade of canary-yellow!

GETTING YOUR OMBRÉ ON!
As mentioned earlier, to create an ombré design in cold process soap, you’ll want to work with soap batter that remains nice and fluid from start to finish. This means using a well-behaved fragrance oil, as well as a well-behaved soap recipe too; one that isn’t prone to “moving quickly”, or thickening up too fast. Just as a personal preference, I’m not a fan of using full liquid amounts in my soap recipes, and always opt to employ some degree of a liquid discount, so whenever I’m working on a soap design that requires a slower-moving, more “forgiving” soap recipe, I turn to an old “tried-and-true". That recipe is listed down below for anyone who might want to give it a try, but there’s something special about it, beyond just being a wonderfully reliable, awesomely forgiving recipe that produces stellar bars of soap... It just so happens to be the exact same recipe you’ll find pre-measured, pre-mixed, and ready to go with Nurture Soap’s Soap Making Oil Blend! If you’re a fan of skipping to the fun parts of soap making, while having all your batch oils ready to rock in one convenient, easy-to-use oil-blend, I highly recommend Nurture Soap’s Soap Making Oil Blend!
We’ll begin this design-technique once our batch oils and lye solution have cooled down to anywhere between 85 to 90 degrees Fahrenheit. It’s important to know the weight of the bowl you’ve weighed your batch oils into, as once you’ve carefully added in your lye solution and have brought your soap batter to emulsion only, you’ll subtract the weight of the bowl from its total weight, then divide the difference in order to split the soap batter into two equal portions. If you’re unsure if your soap batter has reached emulsion or not, just remember that emulsion is that state in soap making when your batch oils and lye solution have just combined, but will no longer separate. You’ll no longer see any ribbons of free-floating oil on the surface of your soap batter, but when drizzled with a spatula, it won’t form any sort of trace either. The batter will be thin, more fluid-like, and easy to work with. Once you’ve reached emulsion and have split the batch into two equal portions, you can continue by incorporating the mica colorants and “juicy Apricot” fragrance oil into each one by hand.

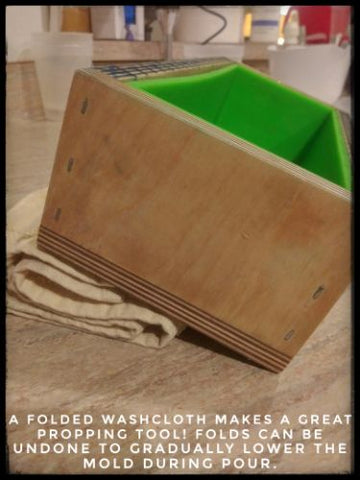
Next, make sure your mold is prepared by having it propped up at an angle, with the downward tilt of the angle facing towards you. This is the side you’ll pour from, and as you pour, you’ll gradually reduce the angle from which your mold is propped. This is to help your soap batter disperse easier and evenly from one side of the mold to the other. It will also create more room for pouring as the mold begins to get full. When you pour from a tilted angle, naturally, the side nearest you (the downward tilt) is going to fill up faster than the opposite side of the mold. Gradually reducing that angle as you finish pouring will help to get your mold filled to the very top, while also ensuring your soap batter is distributed evenly throughout. I’ve personally found a folded wash cloth to be the best tilting-tool for the job! As you pour, and the side nearest you gets too full to continue, simply undo one of the folds in the washcloth, then continue pouring from this new, lower angle.
We’re now ready to begin pouring a beautiful ombré soap design! We’ll start with the portion of soap batter colored in “Wanderlust” mica, and pour straight down the length of the mold, always pouring from the side nearest you. Going up and down the length of your mold, complete two or three passes with the soap batter. As you pour, use the side of your mold as a guide, allowing the soap batter to flow down it, breaking its fall.

We’ll now begin to create our color gradient. Grab the portion of soap batter colored in “Firefly” mica and pour a bit of it into the portion of soap batter colored in “Wanderlust” mica. How much you add simply depends on how subtle you want your color-gradient to transition from one color to the other within your finished bars of soap. You can pour in as little as a couple tablespoons worth, or more, as desired. Be sure to hand-stir the soap batter well to combine the two colors thoroughly. Each time you complete another pass, or pour, you’ll combine a little more yellow soap batter into the portion originally colored in “Wanderlust” mica, and continue pouring.

It might begin to feel a little tedious after a while, but just keep pouring that soap, stirring in a little more yellow soap batter after each pass. Eventually, you’ll see a lovely gradient of color begin to form, becoming more and more noticeable as you fill your mold. Continue the exact same motion of pour as described above, always stopping to stir in a little more yellow soap batter after each pass. Pour each pass of your soap batter right over the previous one, again, using the side of your mold to break its fall. As needed, and as your mold gets fuller, gradually lower the angle from which your mold is propped.

Eventually, you’ll get to a point where your mold will be almost entirely filled, and it’ll be nearly impossible to fit any more soap batter into it while it’s propped up. You may also notice that both of your portions of soap batter are mostly just empty containers now, and what little soap batter you do have left doesn’t look anything like that deep, coral-red color it once was. Even though you’ve only used one container to pour the batch from, the portion of soap batter that was once colored in “Wanderlust” mica now looks more like “Firefly” mica.
We’ve done a complete “switch-a-roo" with our two portions of soap, but this is exactly what we wanted to end up with! Laying the mold flat, but still pouring from the side nearest you, you can now go ahead and finish filling it to the very top with the remaining soap batter. As you do, you may need to give your mold a little tilt and a little jiggle to help distribute the last of the soap evenly across the surface, but at this point, you’re done! Sweeping across the top of your soap, a beautiful ombré effect will create a “visual tease” of the cut to come!

If you’ve decided to pass on the soap frosting portion of this project, but would like to add a touch of “swirly-pizazz” to the top of the loaf, a Taiwan-swirl style “zigzag” across the very surface of the soap would look positively pretty! You could also leave it as-is, if preferred, since any way you slice it, you’re bound to end up with one fabulous batch of soap! Just give the top a good spritzing of rubbing alcohol to help prevent soda ash (If possible. I know Isopropyl alcohol is either rare to come by, or ridiculously inflated in price these days, so if you don’t have any on-hand at the moment, don’t sweat it!), then insulate the batch overnight and call it a day! However, if you’d like to continue by mixing up a batch of soap frosting, then this next section is for you! Just be sure to wait until the top of your soap has become firm enough to support the weight of soap frosting before proceeding.
OMBRÉ-LIEVEABLE EMBELLISHMENTS!
For the soap frosting, and accompanying piped-top, I decided an uplifting and bright shade of yellow would create that perfect touch to complete the project! I chose the lightheartedly apt “Rise & Shine” mica for the soap frosting, and wasn’t the least bit surprised or worried when it turned a lovely shade of orange. This is totally normal, especially for lighter shades of yellow, and completely temporary too. Once the process of saponification is complete, that cheery shade of yellow will return, good as new- promise!
To incorporate more of an ombré-type “look” into the soap frosting itself, I added a dusting of Nurture Soap’s magnificent “Heart’s Desire” Enviroglitter. Using a heavier hand at the base of the soap frosting, I used one of Nurture Soap’s Glitter Spray Pumps to gradually apply less and less of the Enviroglitter as I dusted my way to the top of my frosted peaks. This was a fun and easy way to add some sparkling shimmer to the top- ombré-style!

Once I was happy with my ombré-inspired dusting of “Heart’s Desire” Enviroglitter, I continued by carefully placing my apricot and leaf embeds on top, then took a quick glamour shot of my temporarily-orange, soon-to-be-yellow-again, batch of soap! I finished up by insulating the batch under a blanketed cardboard box, then tucked it in for the night!

The following morning, I was expectantly happy to find a soft, pretty shade of light, canary-yellow peeking through the coral-pink, shimmery highlights of “Heart’s Desire” Enviroglitter! What was once a glorious shade of orange just hours previously, had now changed back into the happy-go-lucky shade of yellow it originally was, thanks to the magical science of saponification! The batch itself smelled like pure joy and sunshine, so it was time to get it cut and see how this handmade ombré soap turned out! If you’re curious as to what pure joy and sunshine smell like, just grab a bottle of Nurture Soap’s “Juicy Apricot” fragrance oil, unscrew the cap and take a big sniff!

SIEZE THE INSPIRATION, SIEZE THE DAY!
Sometimes inspiration strikes at the very last moment, and when it does, you’ve just gotta seize it and roll with it! That’s exactly what happened with this batch of soap! If you happen to feel inspired by my own inspiration, you’re more than welcome to roll with it too! You see, as I cut this batch of “Apricot Sunrise” handmade soap, marveling at the beauty of an ombré-colored sunrise captured in bar-form, one phrase kept repeatedly coming to mind. I grabbed my plastic alphabet molds, my jar of “Coral Reef” mica, and decided to roll with it!

I’ve attached quite a few melt & pour embeds to the face of cold process soap bars in my day, but never actually a word or phrase. However, the fact that this particular phrase seemed to be stuck on repeat in my mind told me I needed to at least give it a try (As if the pour itself hadn’t been tedious enough!). If you’d like to do the same with your own batch of fabulously handmade ombré soap, you can find super-easy, step-by-step instructions (With pictures included!) on how to attach melt & pour embeds to the face cold process soap in many of my previous blogs, including one of my more recent ones entitled: “Your Amazing Face & My Favorite Face Soap Recipe”. So, what was this phrase that kept coming to the forefront of my mind each time I cut another bar from this batch of soap? Well, I could tell you, but I think it’ll be more fun if I show you!

“Carpe Diem” is a Latin phrase which means “seize the day”. It’s extremely likely you already knew that though, and have heard this phrase many times before. It was first coined all the way back in 23 BCE, when the famous Roman poet, Horace, used it in one of his odes. This was Horace’s wise and eloquent way of conveying the idea that all one truly has is today, the present, and that it should be lived with enjoyment. I’m sure we’ve also all heard the phrase, “Tomorrow is never promised.”, so it seems Horace was definitely on to something here!
As I cut my batch of soap, pondering this thought-provoking phrase, it occurred to me that in my own artistic way, I was literally “seizing the day”! I mean, right in the palm of my hand, I could see the colors of a majestic sunrise taking shape within each and every bar of soap! From a different perspective, I was also using that moment to “seize the day” on a more internal level... My absolute favorite part of soap making is when it’s time to unmold and cut the batch. To me, the enjoyment of being able to see what I’ve created, one unique slice of soap at a time, is a feeling I’ll never grow tired of, and I positively love those moments! As you “seize the day” in your own amazingly artistic ways, I hope you remember to stop and smell the apricots every now and then, and never forget to fully enjoy your soapy accomplishments! Carpe Diem, my thoroughly awesome fellow crafters!

SOAP RECIPE:
*The batch oils and percentages listed here are exactly the same as Nurture Soap’s fantastic Soap Making Oil Blend! Make life simple, fun and easy with the finest quality batch oils, conveniently pre-mixed, pre-measured, and ready to go!
- Sodium Hydroxide (Lye) @ 5% Superfat
- Distilled Water @ 33.33% Lye Concentration (2:1/Water: Lye)
- 40% Refined Olive Oil
- 25% Coconut Oil
- 25% RSPO Palm Oil
- 5% Sweet Almond Oil
- 5% Castor Oil
- 6% “Juicy Apricot” Fragrance Oil
- 3% Sodium Lactate (*Optional)
- ½-1TBS/PPO White Kaolin Clay (*Optional)
- 1tsp/PPO “Wanderlust” Mica
- 1tsp/PPO “Firefly” Mica
SOAP FROSTING:
- Sodium Hydroxide (Lye) @ 5% Superfat
- Distilled Water @ 33.33% Lye Concentration (2:1/Water: Lye)
- 35% Refined Olive Oil
- 30% RSPO Palm Shortening (AKA: “No-Stir Palm”)
- 25% Coconut Oil
- 10% Castor Oil
- 1tsp/PPO “Rise & Shine” Mica
- “Heart’s Desire” Enviroglitter
- Optional Embeds in “Coral Reef” Mica
- Optional Embeds in “Rise & Shine” Mica
- Optional Embeds in “Orange Vibrance” Mica
- “Mimosa Yellow” Mica for Dry-Painting Embeds (*Optional)
- ATECO #808 Piping Tip