FROSTING FRUSTRATIONS
Making soap frosting to pipe the tops of your soap batches with isn’t just addictive and fun, it’s also quite easy too; perhaps easier than you may think! When I first began looking into ways in which I could make my own soap frosting, I came across plenty of information out there, with much of it telling me it was either a complicated process (it’s totally not!), or that I needed a special, sometimes even secret, recipe to make it (you totally don’t!). I found information which told me I needed to use a special type of recipe in order to make a successful batch of soap frosting, and that it needed to contain a crazy-high percentage of hard oils. Oftentimes I was instructed to use recipes which consisted of a whopping 80% hard oils, and in other cases, even 100% was suggested- YIKES!
When I plugged these recipes into Soapcalc, they were considerably unbalanced. Now, I’ve always felt that Soapcalc is a wonderfully helpful tool for soap makers, and can certainly provide a good, general idea of the properties in which a specific soap recipe will impart to a finished batch of soap, but it most certainly isn’t the “soapmaking bible”. First of all, Soapcalc can’t provide the information for which the properties of different additives impart within a recipe, and subsequent finished soap. It can’t calculate the differences in superfat percentages and how that affects the lather and moisturizing properties of a recipe, and I for one have made plenty a soap batch in my day where Soapcalc generated less than awesome numbers for, only to end up with a truly fabulous bar of soap! With all this being said however, even good ol’ fashioned experience has taught me that a nice, balanced bar of soap (with the exception of some recipes, such as castile, coconut oil, bastille, etc.) contains a combination of both hard and soft oils. I wanted my own soap frosting recipe to have that same balance; to be just as balanced and skin-loving as the loaf of soap I was piping it on top of.
Then there was the process of it all. Some well-meaning advice and instruction out there advertised that in order to successfully make soap frosting, I had to do all these unnecessary steps with a recipe that already contained an unnecessary amount of hard oils, then agonizingly babysit my KitchenAid stand mixer for the next foreseeable future. I didn’t have time for that, and by the second time I had employed this method, I wasn’t enjoying myself, I was wasting precious moments of my life just standing over my KitchenAid, and I knew this wasn’t going to work out for me. What’s more, I didn’t even like the results I was getting! Making soap frosting in this way, and with these recipes, I found the soap itself to be dry, crumbly and difficult to work with. I didn’t like the way it felt on my skin, and I felt like it wasn’t doing any justice to the skin-loving recipe I was piping it on top of. There had to be a better, easier way.
I began to think and observe… Some of my favorite, most commonly used cold process soap recipes contain anywhere from 50% to 60% hard oils, and it made me wonder if the recipes I loved and used most often could be used to make amazing soap frosting recipes too. I mean, why couldn’t I just take the very same recipes I was already using for my main batches of soap and use them to make my soap frosting too? The answer: I absolutely could! So, I’m here to tell you that if you’d like to make soap frosting but think you don’t know how, or think you don’t know of a recipe to use, there’s an extremely high chance you DO! If your soap recipe can reach a thick trace (as they all can), then you’ve got a soap frosting recipe, and if you know how to make cold process soap, then you know how to make soap frosting too!
So, let’s dive in and make a batch of soap frosting together! For this soap batch itself, I used Nurture Soap’s sensational, irresistible, refreshingly crisp and juicy “Cucumber Melon” fragrance oil, alongside their fabulous “Mango Tango”, “Hello Spring”, “Summer Crush”, “Hollywood Pink” and “Winter White” micas! For the design, I decided to do a hanger swirl, but for this blog post, we’ll be focusing on the soap frosting part of the project, so feel free make your main batch of soap any which way that inspires you! I truly feel that virtually any cold process soap recipe can be used to make soap frosting too, but if you feel like you could still use some guidance in this area, here’s four of my personal favorite soap frosting recipes to get you started! Feel free to choose any of the following recipes to make soap frosting for your own soapy creations if you’d like! All are very simple, contain ingredients which are easily accessible, and make for a great bar of soap!
Recipe #1 (Palm-Free)
- 30% Coconut Oil
- 30% Lard or Tallow
- 30% Olive Oil
- 10% Castor Oil
*Superfat at 5% with a 33% lye concentration (2:1/water: lye)
Recipe #2 (Vegan with Palm)
- 30% Coconut Oil
- 30% Olive Oil
- 30% Palm Oil
- 10% Castor
*Superfat at 5% with a 33% lye concentration (2:1/water: lye)
Recipe #3 (Palm-Free/Vegan “Double Butter”)
- 35% Olive Oil
- 30% Coconut Oil
- 15% Shea Butter
- 10% Castor Oil
- 10% Cocoa Butter
*Superfat at 5% with a 33% lye concentration (2:1/water: lye)
Recipe #4 (Palm-Free/Vegan with Shea Butter)
- 40% Olive Oil
- 30% Coconut Oil
- 20% Shea Butter
- 10% Castor Oil
*Superfat at 5% with a 33% lye concentration (2:1/water: lye)
Currently, I’ve got quite a bit of cocoa butter on-hand just begging to be used, so for this soapy project, I made both my soap batch and soap frosting with recipe #3. Regardless of which recipe you use though, the process remains exactly the same. So, let’s get started on making a beautiful batch of soap frosting, and a beautiful batch of high-top soap!
TO EMBED OR NOT TO EMBED?
You absolutely do not need to make and decorate the top of your soap frosting with embeds to produce a gorgeous batch of soap, but if you’d like to include embeds, that’s perfectly great too! Embeds are a fun and easy way to embellish the tops of your soap batches, so before I get started on the soapmaking process itself, I always begin by making my embeds.

For this project I used Nurture Soap’s Small 9 Ball Silicone Mold (to represent melon balls!), and two plastic candy molds I purchased for a couple bucks each from an online cake and candy decorating supplies shop. After much experimenting, trial and error, I’m extremely picky about which melt & pour soap bases I use to make my embeds, so I make all my embeds with Nurture Soap’s Low Sweat Soap Bases (I used their clear soap base for this project). The melt and pour soap bases Nurture Soap carries are the superior choice for me for several reasons: First, they really are low sweat, which is very important when you’re adding melt & pour embellishments to the top of cold process soap batches which must be cured, and can’t be packaged right away. Second, these are hardy bases! They stand up to the heat of saponification (I’ve had other melt & pour soap bases completely re-melt on me when I insulted the batch. Nurture Soap’s bases have never re-melted on me!). Third, they melt down with ease, accept colorants beautifully, unmold easily from any type of mold I use, and set up quickly so that my embeds are ready to be unmolded within a matter of minutes. Most times, I even put my poured embeds in the freezer for about five minutes, and once they’ve set up, they pop right out of the mold, no fuss, no fight! And last but not least, these bases feel great! The embeds are rock hard with absolutely no sticky or tacky feel. The lather is copious, and isn’t the least bit drying to my skin. They’re actually the only bases I’ve used that more closely resemble the properties and feel of my own cold process soaps. For these reasons, Nurture Soap’s Low Sweat Soap Bases are the only bases I use to make my embeds.
For this project, I made “melon wedges” (at least in my mind that’s what they are!) using the beautifully vibrant “Mango Tango” mica, “melon balls” with the ever exquisite “Summer Crush” mica, and “cucumber halves” (another instance of me using my creative imagination!) with the fabulously sprightly “Hello Spring” mica!

PIPING TIPS… AND TIPS!
For those crafters who have always wanted to try making soap frosting but felt it was beyond their budget to do so, and/or felt they needed to invest in expensive equipment or kits to get started, I’m here to tell you that I am also a soap maker on an oftentimes tight budget, and gathering the supplies you’ll need (or want!) does not need to break the bank! I purchased my couplers and many of my piping tips right here at Nurture Soap at excellent prices, as well as shops on Etsy which offer an abundance of different piping tips and tools at very low prices! You don’t need to invest in a ton of equipment to have a wide range of piping possibilities available to you!
The basic tools you’ll need are couplers, tips and piping bags. For couplers, I recommend having at least one medium and one large coupler handy, and I purchase my 16” piping bags at a local shop for less than $6 a box. What’s great about piping bags is that they are so easy to wash and reuse too! I can get a good seven to eight uses from one single bag before it needs to be replaced, so one box of piping bags can be utilized to last a very long time! When it comes to piping tips, it can be easy to go hog-wild collecting different tip styles and designs, but for me personally, I reach for the same four different tip designs most often. Those tips include French tips, round tips, open star tips and closed star tips. With these four different tips available in various sizes, I have a myriad of unique design possibilities available to me!

EVEN MORE (PIPING) TIPS!
We’ve covered the basics of recipes, embeds and equipment, so with this knowledge in-mind, it’s time to get started on preparing and making soap frosting! I finished pouring and hanger-swirling my soap batch in my 2.5lb. Basic Soap Mold, and all was right in my soapy world! My workspace smelled AMAZING, thanks to Nurture Soap’s sensationally mouthwatering “Cucumber Melon” fragrance oil (oh how I LOVE this scent!), and my chosen micas made for a beautiful melon-inspired menagerie of eye-catching color! It’s very important though that once you’ve finished pouring your batch, you allow it to set up to a point where it will be able to hold and support the soap frosting you’ll be piping on top of it. This particular fragrance oil behaves so exceptionally well in cold process, once my batch was poured, it was still very fluid.

That’s another key tip to remember… 99% of the time I incorporate fragrance into my soap frosting batches as well. When it comes to soap frosting though, it’s super important that you only use well-behaving fragrance oils. If a fragrance oil mildly rices, but doesn’t accelerate, that’s totally fine, since you’ll have plenty of time to stick blend it back to smooth, but fragrances which heavily accelerate or seize just won’t work for soap frosting. If a well-behaving fragrance oil discolors, you’ll have two options: Embrace the discoloration, or leave your soap frosting unscented. While I waited for my freshly-poured batch of soap to set up to a point where it would support a piped-top, I used the time to get my workspace and tools ready to make soap frosting!
PREPARE FOR PIPING!
Let’s rewind a little here… As I was preparing my main batch of cold process soap (making my lye solution, weighing, melting down and combining my batch oils, getting my micas measured out, etc.), I was simultaneously preparing my batch of soap frosting too. I did everything in doubles, making two lye solutions, two containers of batch oils, weighing out two beakers of fragrance oil, and two sets of mica colorants (one color being reserved for my soap frosting). I do this so that when I’m finished pouring my main batch of soap, my soap frosting batch is already prepped and ready to go! The only differences that my soap frosting batch has from my main batch is that I don’t make my usual kaolin clay slurry with the portion of fragrance oil I’ll be using in my soap frosting; I don’t incorporate sodium lactate, as I do in my main batch (a piped-top needs no unmolding, so no sodium lactate necessary); I don’t disperse my mica in oil, as I’ll use the batch oils themselves to do this; and regardless of if I’m using an alternative liquid in my main batch or not, I used distilled water to make the lye solution for my soap frosting. By keeping my soap frosting recipe simple, reserving all my additional “goodies” for my main batch, I’m able to keep costs lower, which is a savings I can pass along to my customers too! A fantastic batch of soap that doesn’t cost me or my customers an arm or a leg… It’s a win-win!

Before I start whipping up soap frosting all willy-nilly like, I get my piping bag ready to go first! Make sure when attaching your coupler and piping tip to your piping bag that it’s on there, nice and tight! The last thing you want is for your coupler to inadvertently get squeezed out the top of your piping bag and end up plopping off, right onto your beautiful piping job (speaking from experience here!). For this project, I used an Ateco #868 French piping tip with its compatible large coupler.

The next thing I always do with my piping tip is a very simple piece of advice (I didn’t want to keep using the word “tip” in the same sentence!), but a very effective one. Since I like having both of my hands free to fill my piping bag, I grab one half-sheet of a paper towel and fashion a little “plug” out of it. I insert this makeshift plug into my piping tip so that none of my soap frosting leaks out as I fill the bag.


I then take the excess paper towel that’s sticking up and fold it down and around the piping tip itself. Doing this actually does serve a purpose, as it helps to hold my piping bag steadier within the tall cup I drop it down into.

You can probably guess what the next step is! From here, I drop my piping bag down into a tall, narrow cup. I actually didn’t have any cups that were tall enough for this purpose, so I tapped into my inner recycle/reuse thought processes and fashioned my own by washing an empty container of sodium hydroxide very, very well, then cutting the top off. This works great for holding my piping bags upright and steady, so if you don’t have a cup or container that’s tall or narrow enough for your piping bags, just tap into your own inner recycle/reuse thought process, and look for objects around your home which can be made into one!

The very last step to getting your piping bag ready for filling is to simply fold down the excess sides of the bag so that you don’t have to stand on your tippy-toes when it comes time to pour your soap frosting into it. That’s all there is to it! You now have an easy and convenient way to pour that glorious soap frosting into your piping bag, while still having both hands free to do so!

With the piping bag all set up and ready, you can move on to the fun stuff- preparing your batch oils to be turned into beautiful, fluffy soap frosting! At this point, you can now add your mica colorant and optional fragrance oil to your soap frosting batch oils. This is always my favorite part, as I will never get tired of seeing how pretty micas look when dispersed in oil! I add my dry, pre-measured mica and fragrance oil directly to the batch oils, then use a mini mixer to quickly get that lovely mica dispersed into the oils nice and good! For this project, I used “Hello Spring” mica and was completely entranced by how gorgeous and brightly pigmented this color is!

FANTASTIC FROSTING
This is it! The moment we’ve been waiting for! It’s time to make soap frosting! I promise, if you’ve never done this before, you’re going to be surprised by how easy (and so much fun it is)! First is to incorporate the lye solution into the batch oils, and you’ll do this the exact same way you’d incorporate the lye solution into any batch of cold process soap. Next, using your stick blender, start blending until the soap batter reaches a nice, light trace.

You can certainly blend for longer if you’d like, even choosing to blend all the way until your soap batter reaches a pipeable consistency, but the reasons why I personally stick blend to a light trace and then stop are because I don’t want to inadvertently over-blend. I feel like I have more control over the consistency of my soap frosting if I allow it to thicken on its own, as there’s a very fine line between the perfect consistency and too thick. My other reason is purely a frugal one… I don’t want to burn out my stick blender!
Once your soap batter has reached trace, you can leave it be, coming back periodically to stir it and check the consistency. For me, my soap frosting usually reaches the perfect piping consistency within about 5 to 10 minutes, which is just long enough to enjoy a cup of coffee! So, what is the perfect piping consistency? Well, I’ll show you! I have a way in which I personally gauge my soap frosting to tell if it’s ready or not, and it’s never failed me! When you stir your soap batter to check the consistency, if the soap batter runs down the side of the bowl as you scrape the excess soap off your spatula, it’s not ready yet.

When you check the consistency of your soap batter, and the batter holds its shape where you stirred it, and sticks to the side of the bowl when you scrape the excess soap batter from your spatula, it’s ready!

PIPING MAKES PERFECT
Alright, so you’ve got yourself a perfectly pipeable batch of soap frosting… Now what? Well, it’s time to fill that piping bag and get to creating something awesome! Using both hands (because you can!), go ahead and pour your soap frosting into your piping bag.

When you’ve poured as much of your frosting into the bag that will pour, use one of your hands to hold the bowl, and the other to grab a spatula, using it to get every last bit of soap frosting into the piping bag. Different sizes of piping tips require different amounts of soap frosting, with large piping tips usually requiring a little more, so for a main batch of this size (32oz. of oils), I made a 15oz. batch of soap frosting. I’ve found that a 15oz. batch of soap frosting is the perfect amount for this tip size and 2lb. batch of soap, with virtually no leftover soap frosting when I’m finished. For medium-sized piping tips and 2lb. soap batches, I make 14oz. batches of soap frosting, but keep in mind that this is personal preference too. You can make your piped-top soap batches as low or as high as you’d like, so for your personal needs, the batch sizes I make may be too much frosting, or not enough for you. That’s why I always suggest that first-timers start with a soap frosting recipe that’s half the size as their main batch of soap, then adjust the recipe as needed from there.
Once the piping bag is completely filled, unfold the sides of the bag back up, lay the cup down on its side and remove the piping bag. If our makeshift paper towel plug has done its job, there won’t be any soapy messes in the bottom of your cup! From here, use a spatula to push the soap frosting down toward the piping tip. This will also help to fill in any gaps or air pockets you may have in the frosting. If you notice any particularly stubborn air pockets, you can also use your hand to “massage” them away through the bag.

Once all the soap frosting has been completely pushed down towards the frosting tip, you can now tightly twist the filling end of the bag closed, hold it upright, with the piping tip pointing up towards the ceiling, and remove the paper towel plug.
Before we continue, I wanted to quickly address the aggravation of lopsided soap tops, and what you can do to help remedy that if you struggle with this as well. In the very beginning, I was making some pretty lopsided soap tops there, and I realized this was because I have terrible depth perception! I simply cannot pipe the tops of my soap loaves from one spot and have them come out symmetrical to save my life! I host a Facebook group called High-Top Cold Process Soapmaking though, and from chatting with others in the group, I know I’m not the only one who’s “visually challenged”! I still have moments where my soap frosting doesn’t come out perfectly symmetrical, but this little tip I’m about to share with you has helped me to improve tremendously! Please keep in mind though that if your soap tops don’t turn out 100% perfect, that’s absolutely alright! Little imperfections become perfections when they manifest the unique beauty and charm of a gorgeous batch of soap, made from scratch with your two hands, and your whole heart!
In piping tops that aren’t absurdly lopsided though, it helps if I begin by piping the ends of each layer first, then pipe the side that’s closest to me next, followed by turning the mold around to pipe the other side, then filling in the middle last. By turning the mold as I go, I’m always piping the side that’s closest to me, which has really helped with my depth perception issues, and I no longer end up with the leaning tower of soap!


As you go from piping one layer to the next, don’t pay too much mind, or an excessive amount of attention, to what the middle of your soap frosting looks like. No one is going to see how pretty you piped the middle of your soap, and in my experience at least, the more perfect and pretty I’ve made my middle look, the more riddled with gaps and air pockets my bars have been when cut. There’s no guarantee that every single one of your high-top soap bars are going to be completely air pocket-free, but if you pipe the middle of each layer with no real rhyme or reason, focusing more on filling in any visible gaps or holes you see, you’re guaranteed to produce more bars of soap with smoother tops and less gaps or holes in them. So, the moral of this story is: Focus on the sides of your high-top soap designs looking pretty, not the middle! And don’t beat yourself up if you see a gap or two in your finished soap bars. Remember, “imperfection” just means perfectly handmade!

EYE-CATCHING EMBELLISHMENTS
Working step-by-step, layer-by-layer, we’ve successfully made a batch of wonderful soap frosting, and have piped the top of our soap loaf! Things are looking great, so you might be asking yourself, “What’s next?”. Well, what comes next is entirely up to you and your own unique creativity! You can choose to stop right here if you’d like, and if you do, you’ll have yourself a perfectly awesome, truly beautiful batch of handmade, high-top soap! However, if you’re like me and are hopelessly addicted to anything that sparkles (and even more head-over-heels for eco-friendly things that sparkle!), you’ll want to embellish your frosted top with one of Nurture Soap’s jaw dropping EnviroGlitters or micas!

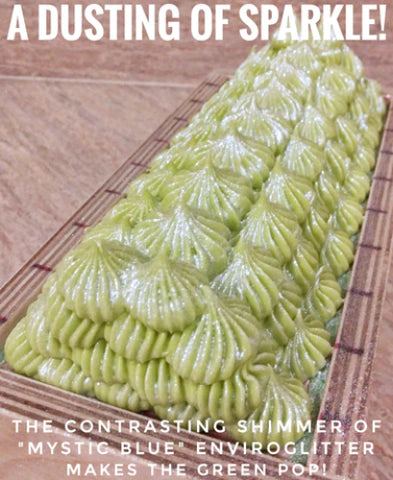
Because I colored my soap frosting with one of the most fabulously fresh and enlivening shades of green I’ve ever seen (Nurture Soap’s “Hello Spring” mica), I decided to embellish the top of this soapy project with an utterly enchanting EnviroGlitter which would complement it beautifully. The phenomenal, multi-blue toned shimmer and glimmer of “Mystic Blue” EnviroGlitter is thoroughly mesmerizing, and when sprinkled on top of contrasting colors (like greens!), truly makes these colors pop! So naturally, I had no other choice than to add a healthy dusting of “Mystic Blue” EnviroGlitter to the top of my soap! To “bling out” the tops of your own soapy creations, tea strainers, empty spice shakers or Nurture Soap’s Glitter Spray Pumps all work great!
The very last step was to adorn the top of my soap frosting with the bright and cheerful melt & pour embeds I made earlier. If you’ve noticed in any of the pictures, you might’ve seen that my mold has small markings on it, which indicate where I’ll be using my soap cutter to slice my loaf into bars. I cut my soap bars at 1” thick, so I’ve made each marking on my mold to be spaced exactly one inch apart. I’ve also accounted for the two end pieces I’ll cut off. When placing my melt & pour embeds on top of my soap frosting, all I need to do to ensure they’re properly spaced is to place each embed between these “cut marks” and I’m good to go! With a quick spritzing of rubbing alcohol, my soap-frosted batch of “Cucumber Melon” handmade soap is ready to be insulated under a towel-draped cardboard box and put to bed for the night!

UNMOLD AND BE BOLD!
Unmolding my high-top soap batches comes second nature to me now, but it wasn’t always that way. The very first batch of high-top soap I ever made, I specifically remember thinking to myself, “Now, how on earth am I supposed to get this thing out of the mold?”! It’s actually much easier than it seems! Once your soap is ready to be unmolded, simply pull away the sides and ends of the mold, as you normally would. With your thumbs pushing down on the two end corners of your mold and pointer fingers pushing up from the bottom, gently break the seal from the bottom of the mold. Flip the mold around and repeat this on the other end so that your soap is freed from the bottom of the mold. Stand your loaf up vertically, then using your thumbs, gently begin to push the loaf out, using your other hand to support the top of your loaf, which will prevent it from accidentally tipping over. Once you’ve pushed your loaf out of the mold by about an inch or so, you can now pull the mold away, and eventually off, by gradually “walking” your loaf out of the mold, pulling it forward with your supporting hand as you go. It’s very easy, and by the second time you do it, you’ll be a pro at unmolding your high-top soap batches!

So, there you have it! From the very start to the very finish, these are my personal and absolute best, most tried and true recipes, tips, tricks and procedures for making soap frosting and a magnificent batch of high-top soap! I have always strongly and firmly believed that knowledge should be both accessible and shared, so I truly hope that in some small way, you’ve found some value, help or guidance in the knowledge I’ve shared here! To all my fabulous fellow soap makers, may you go forth and be bold in your crafty endeavors! May you always knock your own socks off with your astonishing abilities and astounding works of soapy art! Equally as important, happy high-top soapmaking, my talented friends!

