
TO CPOP OR NOT TO CPOP?
Father’s Day is fast approaching, and my husband is running out of soap! I know you must be thinking, “But Amber, you’re a soap maker! How is it that your fella is running low on soap?”! Well, as I’m sure it’s become pretty apparent by now, I’m quite the sucker for making soap with big, soap-frosted tops! Although my husband certainly appreciates the artistry of such soap designs, when it comes to the type of soap he prefers to lather-up with, he enjoys a more straight-forward, simpler bar. I secretly get a little excited whenever my husband lets me know he’s getting low on soap... His preference for a simpler design means I get to employ one of my most favorite methods of soap making: CPOP!
Since this week’s project has a more masculine theme to it, I decided to embrace both that, and Father’s Day, and make this a special Father’s Day treat for anyone who might like to try this at home in their own soapy creations! Unfortunately, I’m running a little behind, so the actual soaps (Should you choose to make them!) won’t be fully cured by the time Father’s Day rolls around, BUT... They’ll still make for great “guy gifts” nonetheless, and will be well worth the wait! So, let’s dive on in, and get to boppin’ and CPOP-in' some cold process soap!
To begin, let’s talk about CPOP for a little bit! What exactly is CPOP? Well, “CPOP” (Pronounced: “see-pop”) stands for Cold Process/Oven Process, and is a popular soap making method for promoting gel phase in your handmade soaps. Basically, it’s using heat from your oven to extend the temperature phase during saponification in an effort to promote or “force” gel-phase. What is gel phase, you ask? Gel phase is a temperature phase during saponification, where temperature is increased and maintained for a time, causing your soap batch to take on a more gel-like appearance. In hot process soap making, the look of this phase is often compared to the slightly translucent look of applesauce. Gel phase in cold process soap making can be promoted intentionally, through CPOP or insulation, or naturally (Such as in the case of added sugars, or a particular fragrance oil, which heat up in your soap batch.).
So, why exactly would someone want to force or promote gel phase in their cold process soap batches? There are quite a few reasons actually, and in discussing these reasons, we can get into the “pros and cons” of CPOP soap making! Many soap makers choose to promote full gel in their soap batches in an effort to prevent what’s called “partial gel”. If you’ve ever made a batch of soap that looked like it had a wet spot right in the middle of each bar, then you’ve already had firsthand experience with partial gel! Partial gel is exactly that... It’s a batch of soap where only a portion (namely, the center of the batch) has gelled, leaving the outer edges un-gelled. Although this has no negative impact on the soap itself, many soap makers find this to be aesthetically unpleasing. In an effort to prevent any partial gelling of their batches, many soap makers will often do one of two things: Either force gel, or prevent it entirely. Preventing gel would entail making sure temperatures remain cool during saponification, and ways to do this are placing your batch of soap in the fridge, or leaving it uninsulated in a cool room.
A fully gelled batch of soap will produce a bar of soap that is harder straight away. Not only will the soaps be harder faster, many soap makers believe gelled soaps last longer in the shower too. Because gelled soaps harden fast, batches are usually ready to be unmolded and cut much sooner than un-gelled batches. In my own experiences, my gelled soap batches are usually completely ready to be unmolded and cut about eight hours after being poured. This is especially helpful for the busy soap maker who needs to stay productive, but may be working with a limited number of soap molds. Along with producing a bar of soap which feels hard and oh-so glassy-smooth to the touch, colors and designs in gelled soaps often appear crisper and more vibrant as well.
Keep in mind that not every soap colorant likes to get overly hot though, and this is where a “con” of CPOP soap making can come into play. In my personal experiences with CPOP soap making, most colors do indeed appear more vivid and vibrant in gelled soaps, with some exceptions. Coral shades are pretty adamant about not getting too hot, as well as some orange and yellow shades too. Oftentimes, orange and coral micas tend to take on a more peachy-tone in soap batches that get too hot, and a few shades of yellow seem to lose some of their brightness as well. If you’re making a coral or orange-colored batch of soap, and it’s imperative those colors remain as bold and bright as possible, I’d recommend keeping temps a little cooler.
Other instances where you may want to avoid CPOP (Or keep a close eye on it!) are soap batches which contain a lot of natural sugars, or sugar-containing additives. Sugars are known to heat up in soap batches naturally, and when a batch gets too hot, some pretty unsightly things can happen! Things like cracking and “alien brains”. Yes, “alien brains” is a real thing! Cracking is pretty self-explanatory, but “alien brains” is a common soap making term for a batch which has developed folds or ripples across the top which resemble the folds of a brain. These things certainly don’t affect how awesome your bars of soap actually are, but sadly, they’re just not very pretty!
Another “con” in CPOP soap making can actually be considered a “pro”, depending on how you look at it, and what you’re trying to achieve in your soap’s design. I’m talking about glycerin rivers. While many soap makers are already aware that titanium dioxide is especially prone to the possibility of developing glycerin rivers, this possibility increases with both heat and liquid. Excess liquid in your soap batch can increase the likelihood of glycerin rivers (And this is because water/liquid expands with heat.), and when paired with excessive heat, that likelihood can increase even more so. The good news is that there are ways to help prevent AND promote this! If wishing to prevent the greatest possibility of glycerin rivers in your CPOP soap batches, liquid discounting will help! You can also opt to skip using titanium dioxide, and use a white mica instead. While this won’t guarantee glycerin rivers won’t form, it will certainly help decrease the likelihood or severity of them. On the other hand, if the beautiful, crackled look of glycerin rivers is what you’re aiming for, a CPOP soap batch with titanium dioxide and/or more water will almost certainly give you results!
As for other “cons” that come to mind, it really comes down to what you want out of a batch of soap. For example, if the prospect of a harder, smoother more colorful bar of soap is less important to you than say, producing bars of soap which appear soft and creamy, then CPOP may be a soap making method you’ll wish to skip. That’s the beauty of soap making though; there’s truly no “right” or “wrong” when it comes to the end result that you desire! And speaking of end results... When it comes to CPOP soap making, you’re going to find that many different soap makers have their own approach to it, and that’s absolutely fine too! Some soap maker’s ovens run hot and some run cool. Some crafters prefer to pre-heat their ovens, then turn them off, allowing their batches to warm in the ambient heat, while others prefer to keep their ovens on during the process. Some soap makers keep a close watch on their batches, turning the oven off as soon as their soap has fully gelled, while others just set a timer for an hour and walk away! I’m here to tell you that absolutely no method or process is wrong! The goal (or end result) of CPOP soap making is to produce a batch of soap which has fully gelled. No matter which way you go about doing that, if the result you get is the one you wanted, well then, you did it right!
This is just how I personally like to CPOP my soap batches, and I’m honored to share this with you! If you find a way that works better for you, then by all means, rock that better way! What works best for me and what I want out of my soap batches might not be the same for you, and that’s perfectly okay! Before we jump into making this batch of CPOP soap though, I want to quickly share with you something I wish I would’ve known when I started experimenting with CPOP. This “something” I’m referring to is silicone rash!
When I first began making my first few batches of CPOP soap, I was positively perplexed when one of my batches came out having all these little holes or “pock marks” all over it. The inside of the soap was fine, but the outside was just riddled with them! I quickly learned that this odd phenomenon was called “silicone rash”, and I wanted to know why it had happened and what I could do to prevent it from happening again. The “why” turned out being pretty simple. When silicone undergoes extreme temperature changes, it expands and contracts; expanding with heat, and contracting when it cools down. It was this expansion and contraction of my silicone mold during CPOP which caused all those little pock marks to form on the outside of my soap. The best way I found to prevent this was to prevent the silicone itself from expanding. A silicone liner in a wood mold won’t cause silicone rash since the wood mold literally stops the silicone from expanding. I was absolutely delighted to be able to show you an example of this with this batch of soap! As you can see from the picture here, a very, very mild case of silicone rash did form on my batch, but only at the very top of the soap, where the silicone liner had a little more space between it and the wooden mold. The rash stops right there though! The rest of my batch came out gorgeously smooth, thanks to the wood mold preventing the silicone liner from expanding!

LET'S GET CPOP-ING!
For this soapy project, it was actually my husband who chose the fragrance blend after he couldn’t decide whether he liked Nurture Soap’s “Pheromone” or “Earth Meets Sky” fragrance oil better! His indecision led me to blending these two drool-worthy fragrances together, and the result was drop-dead sexy! If you’d like to try this dapper, rich and clean blend (I HIGHLY recommend it!), 3-parts “Pheromone” fragrance oil to 1-part “Earth Meets Sky” fragrance oil smells like pure heaven!

The mica colors I chose for this project included Nurture’s incredible “Winter White”, “Caribbean Blue”, “Kashmir” and “Belize Blue” micas, but you might notice one tiny problem with that! “Belize Blue” was actually discontinued by the manufacturer (I literally hoard this color!), so unfortunately, if you don’t already have it on-hand, it’s no longer available. All is not lost though! Nurture Soap has got your back with their “Celestial Silver” mica! As you can see from this picture, “Belize Blue” and “Celestial Silver” micas aren’t identical, but both will produce a gorgeously “frosty”, silvery-blue color in soap! So, if you don’t have any “Belize Blue” mica on-hand (Or you want to share your stash with me!), “Celestial Silver” mica is an excellent substitute!


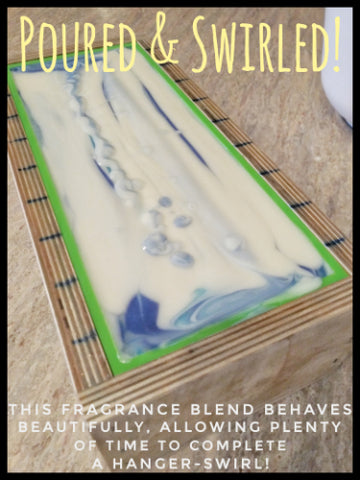
The design for this project is entirely up to you, and the sky is truly the limit! For me and my soapy daydreams, I decided to color the majority of the batch white, and pour off three smaller portions for the three blue mica colors. I kept my temps low (around 85 degrees Fahrenheit) and my soap batter nice and fluid; only blending to a very light trace, so I’d have lots of time to create some pretty, blue swirls within the soap!

The fragrance oil blend itself behaved beautifully, and I had absolutely nothing to worry about when it came to pouring this batch! I was able to take all the time I needed pouring a tiger-swirl down the center of my mold, then following-up with a hanger-swirl. There’s truly no right or wrong way to execute a hanger-swirl in this soap design, but for me, I kept it simple! Starting from the middle-top, I brought my hanger tool down, completed four large loops before hitting the bottom of my mold with the tool, then pulled it right back up and out of the soap, moving it in a slight zig-zag motion on the way up... That’s all there was to it!
With any remaining soap batter, I just spooned it right on top of the loaf (No drop of soap left behind!), then used the back of a spoon to create soft peaks and texture. Once I was happy with the soapy hills and valleys I’d made, I used one of Nurture’s incredibly handy Glitter Spay Pumps to give the top of the loaf a beautiful metallic-like sheen with the help of the always-stunning “Blue Enigma” mica!

The design of this soap was easy, and so much fun to create! Since my husband prefers a simpler bar of soap, understated elegance was the look I was going for! From here, all that was left to do was to get this batch gelled in the oven! While I was playing around with the top of my soap batch, using the back of a spoon to create eye-catching texture, I used that time to get my oven pre-heated. My oven runs a bit on the warmer side, but 170 degrees Fahrenheit is as low as it will go. As soon as the oven was pre-heated and ready, I popped my soap in the oven and quickly closed the door to keep all that beautiful warmth in there! When I first started experimenting with CPOP, I went by the general guideline of allowing my soap to remain at 170 degrees Fahrenheit for one hour. For my oven though, I found this was a little too long. Because my oven does run a tad warmer, I’ve found that 40 to 45 minutes is perfect for achieving a fully gelled batch of soap. Your oven may require more or less time, but as you grow in your CPOP experience, you’ll learn exactly how much time is needed to fully gel your own soap batches. If CPOP soap making is completely new to you though, I would recommend placing your soap in the oven for 45 to 60 minutes at 170 degrees Fahrenheit, then adjusting from there as/if needed.

It’s going to be really, really tempting to open that oven door and take a peek at your batch of soap. I’ve been there and completely understand, but try as hard as you can to resist that temptation! You can certainly turn on your oven light to check on your soap, but keep in mind that when it comes to promoting gel phase, the key isn’t just heat, it’s also maintaining it. Gel phase is a process, which if interrupted could result in a partially-gelled soap batch, so allow your soap to remain in the ambient heat of your oven long after you’ve turned it off. Many soap makers prefer to do this overnight, and while there’s absolutely nothing wrong with that, sometimes it’s just not feasible... Especially when you have a hungry family to feed and only one oven! In my experience, I’ve learned that as soon as my batch no longer maintains heat, and begins to cool down, it’s reached and completed gel phase. It’s at this point that you can remove your soap from the oven and allow it to cool down the rest of the way at room temp. Once removed from the oven, the cool-down happens very quickly, and it’s around this time when my batches are also ready to be unmolded and cut. Depending on the recipe, this is most often around 8 hours after pouring them.
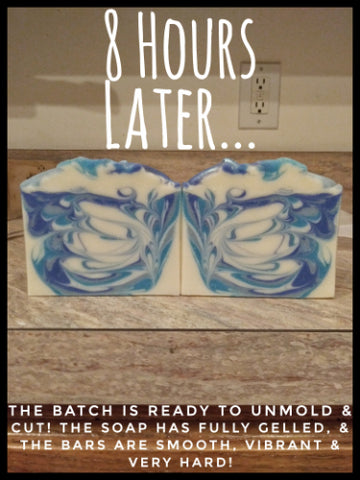
The first thing you’re going to notice about your gelled soap is just how much harder the bars are, and how incredibly smooth they feel. You’ll also notice (and more noticeably in lighter or uncolored portions) that the bars themselves look less “creamy” and more translucent-like. Your colors will be bolder and brighter, with your design crisper and more defined. Congratulations! You’ve successfully completed a beautiful batch of CPOP soap!
ATTACHING MELT & POUR SOAP TO COLD PROCESS SOAP
My Father’s Day-inspired batch of CPOP soap was looking AND smelling awesome, and I was extremely happy with the results! If you’ve read any of my previous blog posts though, you know I never know when to leave well enough alone! I think I’m physically incapable of making a batch of soap and not including a little extra something! In this situation it was dragons! I can’t imagine anyone not loving dragons, and to me, this soap batch was just begging to have some included in its design! I grabbed some Low Sweat, Clear Soap Base, and made dragon embeds colored in “Belize Blue” mica (Which will look just as frosty-blue and beautiful in “Celestial Silver” mica too!). The task proved to be pretty tedious, since each dragon embed needed to be trimmed and “cleaned up” by hand, but it was definitely worth it! If you’d like to get your hands on the mold used to make these dragons, it can be found at several shops on Etsy. To give the dragons a bit more definition and metallic shimmer, Nurture Soap’s “Shimmer Gold” mica looked jaw-dropping when dry-painted atop each one!

The plan was to attach each melt & pour dragon embed onto the face of each cold process soap bar. I’ve briefly described how to do this in previous blog posts, but wanted to cover it again here, since I feel I’ve finally come to the best method of doing this, while also achieving an inseparable bond between the two different types of soap. Naturally, another way to do this would be to melt down a little melt & pour soap base and use it as “glue” to attach the embeds to the cold process soap, but in my personal experience, I’ve found this method to only be temporary... For some reason, melt & pour soap just doesn’t want to stay attached to cold process soap for the long-haul, and many times, I found myself feeling frustrated when the embeds would eventually pop right off again. I wanted to find a way to attach melt & pour embeds to the face of cold process soap bars and have them stay there for good (No popping back off!), so for me, the process I’m about to describe has worked extremely well for doing just that!
As general tip, melt & pour embeds seem to achieve the best adherence to cold process soap when the embeds are freshly-made, and the cold process soap is freshly cut, so I would strongly suggest not waiting too long to attach the newly-made embeds to your soap bars (Especially with CPOP soap, where the bars come out harder from the get-go.). It seems the initial extra moisture in both types of soap helps to create a stronger bond... It’s the excess moisture which forms it, while the process of cure makes it inseparable. The supplies you’ll need include: Distilled water, any type of liquid soap suitable for skin application (It can be liquid hand soap, skin-gentle liquid dish soap, or liquid castile.), a small cup, cotton swabs, a soft-bristle paintbrush, and a non-serrated scraping/trimming tool of your choice.

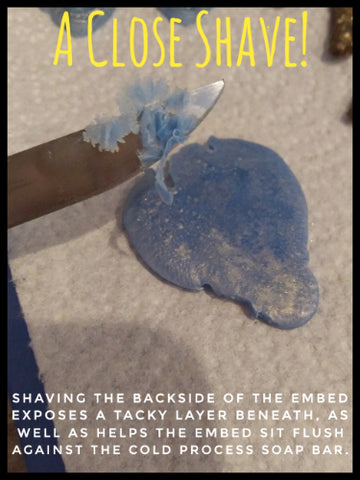
The first thing you’ll want to do is take your scraping/trimming tool, and shave off the topmost layer of soap from the backside of the melt & pour embed. Use your tool to shave down the embed so that it will sit as flush as possible to the face of the cold process soap bar, without any large gaps. This also serves a double purpose in that shaving off the topmost layer of soap from the embed also exposes a slightly “tacky” layer beneath the surface of the melt & pour soap.
Next, you’ll want to create a watery “glue” of sorts. To your small cup, add about 1TBS of distilled water. To the distilled water, add about 1/2TSP of liquid soap, then stir this well to combine. If you rub this water/soap mixture between your fingers and it feels slightly “slimy”, it’s perfect! Using your soft-bristle paintbrush, generously saturate the backside of the melt & pour embed with the water/soap mixture. Don’t be afraid to get that embed fully saturated, paying attention to the outer edges of the embed as well. Use your paintbrush to place a small dab of the water/soap mixture to the cold process soap also; just in the spot where you’ll be attaching the melt & pour embed.

Using your thumbs, or the palm of your hand, press down on the melt & pour embed. Initially, the embed will want to slip and slide around a bit, but eventually you’ll feel it begin to “take hold” of the cold process soap bar. Once the embed is no longer slip-sliding around, and you have it positioned exactly where you want it, apply firm, steady and even pressure for about 30 seconds. You can use your thumbs or the palm of your hand, and if you’d like, you can also place a napkin or paper towel over the embed while applying pressure so that you don’t muddle-up your beautiful embed with finger prints or “people grease”.

Lastly, take a cotton swab and gently clean up around the edges of the embed. Applying pressure can push some of that water/soap mixture out from underneath the embed, but a gentle swipe of a cotton swab will take care of this, no problem!

At this point, you should be able to stand your soap bars up, and the melt & pour embeds will stay put. Avoid touching the embeds in any way for at least 24 hours. The two different types of soap need uninterrupted time to form that bond with each other. As your cold process soaps cure, the bond between the two soaps will grow increasingly stronger!
BE STEEL MY BEATING HEART!
The rich, steely-blue colors of this soap project, paired with a touch of metallic shimmer, whimsical swirls, a positively sexy aroma, and the addition of everyone’s favorite fantasy creature (Dragons!) is only made more wonderful through the process of CPOP! Its colors and design really do stand out, sharp, crisp and defined, and the look and feel of the bars themselves is as hard and smooth as polished stone! “Steel Dragon” just seemed the perfect name to represent this soapy theme, and in trying this method and design in your own crafty creations at home (If you’d like!), I hope you will agree!
While I was only able to cover the tip of the “CPOP Iceberg”, I truly hope it was just the right amount of information to at least get you started in your own exciting CPOP soap making adventures! Covering the basics is always a great place to begin when trying something new, but I hope this inspires you to delve deeper too! There are so many more fascinating things to learn and know when it comes to CPOP soap making, with many extraordinarily skilled, knowledgeable and talented crafters ready to guide you every step of the way! The shared knowledge is out there and available for anyone who wishes to take their CPOP soap making to greater heights, and I’ll be here rooting you on as well! May you thoroughly and always enjoy the soapy ride, and may the special fellas in your life enjoy their “Steel Dragon” handmade soaps! Happy soap making, and a very happy Father’s Day to all the amazing dads out there!


SOAP RECIPE:
*For CPOP, place in preheated oven at 170 degrees Fahrenheit for 45 to 60 minutes. After time is up, turn oven off and allow soap to remain in ambient heat until cooled.
- Sodium Hydroxide (Lye) @ 5% Superfat
- Distilled Water @ 33% Lye Concentration (2:1/Water: Lye)
- 40% Olive Oli
- 30% RSPO Palm Oil
- 25% Coconut Oil
- 5% Castor Oil
- 6% Fragrance Oil Blend (3-Parts “Pheromone” Fragrance Oil: 1-Part “Earth Meets Sky” Fragrance Oil)
- 3% Sodium Lactate (Optional. Added to cooled lye solution.)
- 1TBS/PPO White Kaolin Clay (Optional. Mixed into fragrance oil blend.)
- 2TSP/PPO “Winter White” Mica
- 1TSP/PPO “Kashmir”, “Caribbean Blue” & “Belize Blue” Micas (Substitute “Belize Blue” mica with “Celestial Silver” mica as/if needed.)
- “Blue Enigma” Mica (Dusted on top.)
- Melt & Pour Dragon Embeds in “Belize Blue” Mica (Substitute “Belize Blue” mica with “Celestial Silver” mica as/if needed.)
- “Shimmer Gold” Mica (For dry-painting melt & pour embeds.)