FROSTING INFATUATION!
Greetings crafty friends! If you’ve read any of my previous guest blogs, it’s very likely you’ve noticed a common theme… I LOVE making soaps with soap frosting on top (or “high-top” soaps, as they’re commonly called)! While I’ve always advocated (and always will!) that it doesn’t take a batch of soap with a big, frosted top to create magnificent works of soapy art; for me, it’s my personal way of continuing the artistic fun! Making a high-top batch of soap is like going to the carnival or county fair; re-living childhood all over again! It’s that moment at the end of a long, hot, summer day, when your fingers have developed a permanent, sticky layer over them from all the kettle corn and cotton candy you’ve eaten, and your poor, exhausted parents tell you it’s time to go home. Hopped up on sugar and childhood charm, you’re able to somehow talk them into just one more ride! That’s high-top soap making for me! I enjoy the artistry of cold process soap making so much, a high-top design is that “last ride” for me! It’s my way of continuing, and building upon, the creative fun for just a little while longer!
I remember the precise moment when I first became interested in turning my soapy creations into high-top designs... It was about 3 years ago, and per my usual, I was browsing YouTube (AKA: Google for soap makers!) for some new soap making inspiration. I came across a video of a fellow soap maker creating a big, beautiful, decorative top with soap frosting, and as I watched this video, the very first thought that came to my mind was, “There’s NO WAY I’ll ever be able to do that!”. Because I doubted myself, but my curiosity was piqued, I decided to order a couple bars from this talented soap maker instead. When they arrived, my very first reaction was that of amused laughter! Showing the soaps to my husband, I exclaimed, “These are quite possibly the silliest, most unnecessary bars of soap I’ve ever seen... And I love it!”. I looked forward to my next shower with childlike excitement, and when I used a bar for the very first time, I can honestly say that it was a fun and skin-loving experience! The soap did its job, cleaning my skin as any great bar of soap should, but using It was truly enjoyable too! Something about lathering up with that big bar of artistically-designed soap made me feel happy!
That was the very first moment when I realized there was absolutely nothing wrong with combining the necessary with the unnecessary; marrying the practical with the impractical, and embracing a bit of the excessive! Soap could be functional and beautifully “silly”; skin-loving and fun; wholesome and purposeful, yet wonderfully imaginative too; a multi-sensory experience I could share with others! If I had felt such lighthearted joy from an everyday item, such as soap, and had been delightfully amused and entertained during what was normally the mundane task of showering, just imagine the myriad of ways I could share that experience! And so, I set out to try what I had initially told myself I could never do, and my artistic love affair with soap frosting began!
WHAT MAKES A GREAT SOAP FROSTING RECIPE?
If you’ve never made soap frosting before, and would like to begin the incredibly addictive journey of piping the tops of your own soap batches, I highly recommend reading “The Total Guide to Soap Frosting!!!”, found right here on Nurture Soap’s website! In this blog post, I delve, step-by-step, into the process of making soap frosting, and using it to create big, soap-frosted tops! The blog includes instructions, tips, and tricks which have helped me in my own soap frosting creations, and includes some of my favorite recipes too (I still firmly believe that any cold process soap recipe can be used to make a great batch of soap frosting though)! While I’ll always love these recipes, and recommend them to anyone who might want to utilize a specific one in their own soap making adventures at home, for me, the process of soap artistry and soap making is an ever changing one! I’m always striving to refine my skills, expand my knowledge, and improve in any way I can!
In this ever-changing, ever-improving creative process, I really wanted to formulate a soap frosting recipe that could be universally used and enjoyed. While I reserved different soap frosting recipes for different projects, I began daydreaming about a soap frosting recipe that “had it all”. While the answer may be different for each individual soap maker, I asked myself, “What makes a great soap frosting recipe?”. As I scribbled down the answers to this question, my hand couldn’t keep up with all the thoughts flowing from my mind! When I was finished writing, I had 5 main qualities that I wanted the “perfect” soap frosting recipe to have. Here are those 5 qualities, and what I wanted most in a great soap frosting recipe:
- A great soap frosting recipe reaches that perfect piping consistency (or what I like to call “PPC”) quickly, since I'm much too impatient to wait around forever for my soap frosting to set up on its own, and much too frugal to blend my batter all the way to PPC and accidentally burn out my stick blender! *As for a hint of the recipe to come, this is where the higher percentage of castor oil, and the recipe’s liquid amount/discount come into play!
- A great soap frosting recipe won’t just reach PPC quickly, but once it does reach it, it’ll remain at that consistency for a good, long time. It won’t continue to rapidly harden, or accelerate, and will allow more than enough time to get the top of my batch frosted, and decorative embeds placed without difficulty. Because it remains at PPC for a lengthier amount of time, it won’t dry out quickly or form cracks where the embeds are placed. *This is where the olive oil in this recipe comes into play!
- A great soap frosting recipe is dreamily creamy in consistency and easy to work with. Not only will it have a wonderfully creamy consistency, it’ll also have that beautiful wet-soap sheen! Creaminess makes working with any piping tip so much easier and effortless because the batter holds its pretty shape, but is also soft and manageable enough to fill in any holes or gaps in the middle section of the loaf with ease. *This is where the RSPO palm shortening comes into play within this recipe!
- A great soap frosting recipe contains a good ratio of saturated to unsaturated fats so that the recipe itself is just as balanced and skin-loving as the batch of soap its piped on top of; and indeed, the recipe is so nicely balanced with hardness, cleansing, conditioning, lathering and creaminess properties, it can be used for both the main batch of soap, as well as the soap frosting, because it’s an all-around awesome recipe in general! *This is where all of the oils/fats in this recipe come into play!
- And finally, a great soap frosting recipe will stay true to my most beloved and trusted “KISS rule” (as in: Keep It Simple, Sunshine!), containing oils/fats which produce an excellent bar of soap, while being straight-forward, well-known, easily obtained, and not absurdly expensive. *Again, this is where all of the oils/fats within the recipe come into play, and is especially helpful if you sell your fabulous, handmade creations! Soap is a wash-off product, so many benefits of pricier butters and/or oils simply get washed down the drain (literally and figuratively). It truly doesn’t take a menagerie of expensive oils and butters to create an outstanding bar of soap, and by reserving your more expensive luxury oils and butters for products in which they shine in most, such as lotions, body butters, balms and other leave-on products, you’re able to pass the savings along to both yourself and your customers while never once compromising on quality... It’s a win-win!
For about 6 weeks I tweaked and tested recipe after recipe; then tweaked and tested some more in an attempt to formulate and create my own, so-called “perfect” soap frosting recipe. For a moment there, I began to doubt if I could really and truly “have it all” in a single formulation. That is, until I made a leap of faith and tried something that had been under my nose the whole time! Every time I tested a new recipe, I’d get discouraged because it just wasn’t creamy enough! My heart cried out, “More creaminess, please!”, and after multiple test batches, I finally found my answer... RSPO Palm Shortening!
THE SHORT ON PALM SHORTENING!
So, what exactly is RSPO palm shortening? Well, palm shortening (also known as “no-stir palm”) is palm oil which has had some of its unsaturated fats removed to create a more “fatty-stable” product. This results in the oil having a thick, creamy, buttery-like texture. Because palm shortening has a more stable fatty acid profile, it’s not necessary for the entire product to be melted down and stirred prior to incorporating it into your recipe, such as is the case with traditional palm oil. With palm shortening, you can just scoop out the amount your recipe calls for, and add it directly to your other batch oils (hence its nickname: “no-stir palm”). When entering recipes which contain palm shortening into a lye calculator, you’d simply input it as “palm oil” since the SAP value (or saponification value) of palm shortening is the same as traditional palm oil.
My best piece of advice when it comes to purchasing RSPO palm shortening is to purchase it from a reputable supplier, preferably one focused on selling products for soap making specifically. Some retailers of palm shortening (especially those focused on the food/baking industry) advertise their palm shortening as containing 100% palm oil, but when you take a closer look at the product’s SDS (Safety Data Sheet) documentation, it’s not unheard of to find other ingredients within it; most specifically, cottonseed oil. Now, cottonseed oil is a perfectly safe ingredient to incorporate into a soap recipe, but when present within a palm shortening blend, it’s virtually impossible to know how to account for it when trying to determine one’s superfat. Also, many soap makers actually prefer to avoid cottonseed oil in their soap recipes, as it’s known to be a bit more prone to developing DOS, or “Dreaded Orange Spots” within cured soap. Furthermore, many suppliers, retailers and/or wholesalers of palm shortening aimed specifically toward the food/baking industry can’t account for the product being RSPO certified, which stands for The Roundtable on Sustainable Palm Oil.
A reputable soap making supplier who sells and advertises palm shortening as being 100% palm oil will provide a product which contains nothing but palm oil. They’ll also be able to provide the proper SDS documentation to back this claim up! The world doesn’t have a palm problem, it has a people (industry) problem, so purchasing palm shortening which is RSPO certified, sustainably and ethically grown, harvested and manufactured is something I highly recommend. The more consumers only purchase and demand palm oil which is RSPO compliant, following sustainable and ethical growing and manufacturing practices, the more “big industry” will take notice. As consumers, we’ve done it before when we spoke up and demanded cruelty-free products. We can do it again with the palm oil industry! That logo of bunny ears you now see on countless beauty products, confirming the item and/or company is cruelty-free and against animal testing; we as consumers collectively made that happen! We made it happen when we refused to purchase products that didn’t meet those standards and practices, so don’t feel like you don’t have a voice- you absolutely do! A reputable retailer of RSPO Certified palm oil or palm shortening will have no problems supplying you with manufacturer proof of RSPO compliance, so feel free to politely request this information if it’s important to you too!
It was this not-so-secret, “secret” ingredient that bumped up the creaminess factor of my soap frosting recipe exponentially, and created a formulation which, when combined with my other batch oils, made for the absolute best soap frosting recipe I’ve worked with to date! With a formula that finally crossed off everything on my soap frosting “wish list”, I couldn’t help but share that with my crafting companions here! Please join me as we pipe the top of a fabulous batch of soap with an equally fabulous soap frosting recipe!

THE DESIGN RUNDOWN!
Since we’ll be focusing more on the qualities, behavior and recipe of the soap frosting itself, I won’t be delving as deeply into the process and design of the main batch of soap, as I normally do. I still wanted to share a quick rundown of the stunning mica colors and sensational fragrance oil used to create this specific batch though, just in case you’d like to re-create this design in your own soapy endeavors, or are just looking for a bit of fun inspiration! Think of this section of the blog as kind of a lengthier review, of sorts, for these stellar Nurture Soap products (As if my actual product reviews weren’t long enough! I just can’t help it though... When I get excited about something, I gush!). Most of the time my inspiration for soap batches comes from either a color (or color palette) which visually ignites my imagination, or by a supremely gorgeous fragrance oil which sweeps me away on an aromatic journey within my mind’s eye. for this particular project, it was the fragrance oil!
Newly reformulated, and smelling better than ever, I’ve been positively obsessed with getting Nurture Soap’s “The Grim Reaper” fragrance oil into a batch of soap! The product listing for this uniquely opulent, alluringly mysterious, intriguingly heady (in the most captivating of ways!) floral aroma lists aromatic notes of ylang ylang, tonka, rose and indolic jasmine, which is conveyed masterfully in its scent bouquet! When I smell this fascinating fragrance, I’m instantly transported to the Victorian era; a time when romance and fine art were one in the same! The scent itself carries a deep essence of romance and reverie, but also an aura of deep reflection, with a hint of melancholic sorrow; beautiful, requited love, long lost with the passing of time. It’s an aromatic masterpiece to my nose! In my specific recipe, I did experience mild ricing while working with this magnificent fragrance, but this was easily and effortlessly stirred out by hand. I also experienced mild to moderate acceleration in my particular recipe as well, but as you’ll see in the picture of the cut, it was quite workable regardless, and I was able to quickly execute a 5-color hanger-swirl with no significant difficulty!
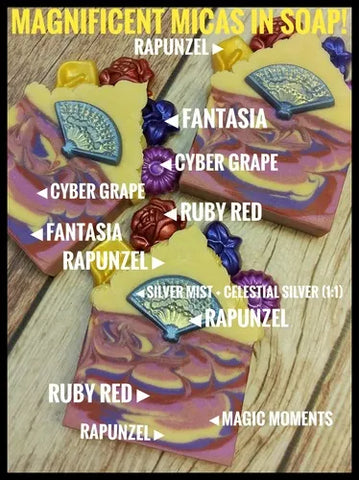
Because this exquisite scent took my imagination back in time, I chose mica colors which I felt best conveyed colors often associated with the Victorian era; royal and dusky purples, scarlet reds, dusty mauve tones, and creamy shades of ivory. “Rapunzel” mica, in particular, creates the loveliest buttermilk-like shade in cold process soap. Pairing this with Nurture Soap’s “Fantasia”, “Ruby Red”, “Cyber Grape” and “Magic Moments” micas set the theme for this project’s design perfectly!

For the decorative soap embeds I’d be placing on top of the soap frosting, I wanted to celebrate the elaborate floral quality of the fragrance oil, as well as demonstrate just how well the soap frosting recipe accepts embeds of various thicknesses. I aimed to fit as many flowers on top of the batch as I possibly could! Calla Lilies in “Rapunzel”, orchids in “Fantasia”, roses in “Ruby Red”, and daisies in “Cyber Grape” micas looked vibrantly elegant, and I’d complete the look with a fine dusting of “Gold Dust” Enviroglitter when all was said and done! To demonstrate that artistic boundaries are as limitless as your imagination, especially with high-top soap designs, I also made embeds in the shape of little hand-held fans. I’d attach these to the face of each soap bar once the batch was cut, and I used a 50/50 blend of Nurture Soap’s “Celestial Silver” and “Silver Mist” micas to color them. This created a soft shade of silvery-periwinkle, which looked gorgeously antique-like when dry-painted with a touch of “Rapunzel” mica!

ON TOP OF IT WITH SOAP FROSTING!
Once my main batch of soap had been poured and allowed to set up enough to support soap frosting on top, it was time prepare the batch by blending in “Rapunzel” mica at a rate of 1tsp per pound of oils. Because “The Grim Reaper” fragrance oil had accelerated a bit in my main batch of soap, I decided to leave the batch of soap frosting unscented. As a general guideline, when it comes to a good batch size to start out with, I recommend making a soap frosting batch which is half the size as your main batch, adjusting from there as/if needed. For example, if your main batch of soap consists of 32oz of oils, start with a 16oz batch of soap frosting.

When your optional mica colorant and lye solution have been fully incorporated into the batch oils, it’s time to begin blending! This particular recipe sets up quickly on its own, so as soon as I see that my soap batter has just reached a medium trace (about 2 minutes of intermittent blending), I put the stick blender down, and allow the batter to reach that perfect piping consistency all on its own. Because this recipe does set up nice and fast, I’m careful to stir the soap batter and check its consistency often.

One of the most commonly asked questions I get when it comes to soap frosting is how to determine when the batter has reached the right consistency to begin piping the top of your soap. The best way I’ve found to do this is by doing what I call “the spatula test”! When scraping excess soap batter off your stirring spatula, if the batter immediately runs down the side of the bowl, it’s not ready yet. When you can scrape excess soap batter off your spatula, and the batter clings to the side of the bowl, it’s at the perfect piping consistency! This particular recipe goes from “not quite ready” to “ready” within 5 minutes, but once it reaches PPC, it stays at that consistency for a good, long while!


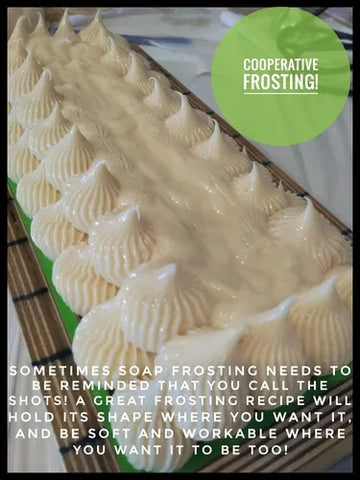
As soon as the soap batter reaches PPC, you can fill up your piping bag and begin piping the top of your soap to your heart’s content! To me, this is one of the most beautiful sights of this particular recipe! The soap frosting has reached optimal consistency; it’s smooth and wonderfully creamy, yet also has that beautiful wet-soap look that even days of the week are named after! I mean, who doesn’t love “wet-soap Wednesday”? Dry soap frosting can be difficult to work with, and problematic when it comes to placing your soap embeds on top, so a frosting recipe which produces a smooth, creamy consistency, while also remaining wet and workable is the best of both worlds!

For this particular project, I chose to pipe the top of my soap with an ATECO #172 “Drop Flower” French tip. The reason for this is because out of all the piping tips I’ve used, I’ve found that if my soap frosting gets too hard and/or too dry, both round and French tips tend to split or crack more noticeably, especially when embeds are placed on top. I’ve also found that if my soap frosting is too thin, this is the piping tip that will show that most noticeably as well. I wanted to use this specific piping tip to demonstrate just how smooth, creamy and workable this recipe remains, while also holding its shape! You want your soap frosting to work for you, not the other way around. A great soap frosting recipe will be beautifully cooperative and multi-functional; holding definition and shape exactly where you want it, while also being smooth and malleable enough to fill in any spaces or gaps exactly where you want it to as well!
When you work with a soap recipe (not necessarily just soap frosting) which allows you to take your time and work at your own, comfortable pace, it simply makes for a more enjoyable soap making experience all around. Inner creativity flows better and more clearly when you’re not rushing through the process. That’s what this recipe is all about, and why I’m honored to share it! It’s about thoroughly enjoying the process, being pleasantly surprised by how easy it is, and piping-away to your creative heart’s desire! For me, it’s also about taking my time to “stop and smell the soap frosting”, while also drooling over how pretty and wholesome “Rapunzel” mica looks in cold process soap!


EASY EMBEDS!
Of course, placing decorative embeds on top of your soap frosting is completely optional, but if you’d like to do so, this recipe is extremely accommodating as well! As mentioned earlier, a soap frosting recipe which hardens or becomes too dry too soon can be problematic for embeds. Even thinner embeds can cause soap frosting to split and/or crack where the embed is placed if the frosting is too firm or too dry. Although there’s absolutely nothing wrong with a batch of soap that isn’t “visually perfect” (I live by the motto that “imperfect” simply means “perfectly handmade”!), sometimes it can be discouraging when you work hard on a project that doesn’t turn out the way you envisioned it. A great soap frosting recipe will accept embeds of any shape, size or thickness with ease, literally forming around the embed, instead of splitting or cracking to accommodate it. Here, I’ve used multiple embeds of various shapes and thickness to show how easily and effortlessly this soap frosting recipe conforms to each embed. For me, this is one of my favorite qualities about this recipe, since admittedly, I’m not the best “embed-placer” in the world, and it takes me a little longer than it probably should to finish up! Thankfully, this recipe is wonderfully forgiving, and allows me all the time I need to get my embeds placed just right! With a shimmery dusting of Nurture Soap’s jaw-dropping “Gold Dust” Enviroglitter, I finished up my soap project, then got it nice and insulated for the night!


GREAT EXPECTATIONS!
When I finally had that “eureka!” moment of formulating and testing a recipe that encompassed everything I wanted in a great batch of soap and soap frosting (This recipe makes for a wonderful main-batch of cold process soap too!), I was actually a little hesitant to share it. Not that I wanted to keep some sort of “secret recipe” all to myself; my brain just doesn’t work like that- I LOVE sharing knowledge! Nope, I was hesitant to share it because, while I wanted to help others have the same fantastic soap frosting experiences as I had, highlighting how and why I enjoyed this recipe so much, I was worried I’d come across as gloating, or “tooting my own horn”. I truly hope I haven’t come across that way; rather, in sharing this soap making experience with you, I hope I’ve only helped to spark inspiration and creativity in your own soap making, soap frosting, and soap artistry journey as well!
Thankfully, this recipe is such a nicely-balanced, simple and straight-forward one, it’s extremely possible many others have discovered and enjoyed it too! While the recipe itself isn’t anything drastically different or monumental, the results I’ve had while using it in my own high-top soapy creations have been! I hope you’re able to take advantage of those same results too! For me, the best “discovery” in creating this recipe came by way of incorporating RSPO palm shortening, or no-stir palm, at the appropriate usage rate. The finished result has been a high-top soap that looks, behaves and feels oh-so smooth and delightfully creamy!

Another fantastic result has been the time this specific recipe has saved me while making it, while also allowing me ample amounts of it to work at my own, leisure pace. I’m able to tap into my inner creativity as much as I’d like, and develop it as elaborately as I want to as well! Are high-top soaps necessary and a little unnecessary too; practical and impractical? Do they embrace a bit of the excessive, being skin-loving and fun? Can they be functional and beautiful; purposeful and amusing? Can soap be wholesome and imaginative; lighthearted, intricate, and even silly sometimes? You bet’cha! Between you and me, I wouldn’t have it any other way!

MY FAVORITE SOAP FROSTING RECIPE:
- Sodium Hydroxide (Lye) @ 5% Superfat
- Distilled Water @ 33% Lye Concentration (2:1/Water: Lye)
- 35% Refined Olive Oil
- 28% RSPO Palm Shortening (No-Stir Palm)
- 27% Coconut Oil
- 10% Castor Oil