PEACE AMONGST THE CHAOS
Seems like everywhere you turn these days, there’s one thing taking precedence on everyone’s mind. When news of a new, or “novel”, virus was first making headlines, I remember turning to my concerned husband and saying these exact words: “You’re not going to catch it! No one you know is going to catch it, so just relax!”. Now that a beloved family member is struggling to get well again, and I’m powerless to take it all away, I wish I could eat every one of those words with a slice of humble pie. No matter how directly or indirectly you’ve been affected by this global outbreak, the truth of the matter is that we have all been affected in one way or another; we’re in this together!
Wouldn’t it be so nice if we could all find a bit of reprieve from the stresses of life? If only for a little while, wouldn’t it be wonderful if we could find a moment of peace; a moment where the first thing on everyone else’s mind is the last thing on yours? Wouldn’t it be great if we could get some therapy; some soul-healing, inspiration-inducing AROMA therapy? We absolutely CAN! Soap making isn’t just one of the best crafts on this planet, it’s also one of the most therapeutic too! Through the magic of your creativity and the science of saponification, a whole world of proverbial blank canvases become available to you for which to “paint” upon! The only difference between you and Bob Ross is that Bob couldn’t take his art into the shower with him- YOU CAN! If soap making isn’t one of the best mediums for which to unwind, de-stress and tap into your inner creativity, I don’t know what is!
For many soap makers (Including myself!), thinking about the most stress-free, enjoyable soap making experiences usually conjures up thoughts of perfect-preforming fragrance oils. You know the kind I’m talking about! It’s those fragrances which remain on their best behavior, from the beginning of pour to the end of it. Those fragrances which allow you all the time in the world to execute your chosen design; the ones which don’t accelerate, rice, discolor, or do anything mischievous in cold process soap. It’s those fragrances which behave just as amazing as they smell! While I’ll always be a fan of those types of fragrance oils, what if I told you that you could take a fragrance oil that’s been put on the “naughty list” and STILL have just as awesome and stress-free of an experience with it?
Enter: Nurture Soap’s “Aroma Therapy” fragrance oil! While this gem of a fragrance oil may have received its share of dissatisfaction due to its not-so-perfect behavior in soap, I know of no other scent better suited for a purely aromatherapeutic soap making experience! Think of me as the defender of fantastic fragrances that have gotten a bad rap! Fragrances are like people... I personally feel that many fragrances which have been deemed “naughty” are just misunderstood. Similar to people, once you learn a fragrance oil’s unique “temperament”, then channel it in ways where it excels most, it positively shines! So, let’s make “Aroma Therapy” fragrance oil shine in a batch of cold process soap together, and in the process, have ourselves a well-deserved, soap making therapy session!

DIVINE DESIGN PLANS!
When I smelled “Aroma Therapy” fragrance oil for the first time, I knew our love was meant to be! Mention the words “green”, “fresh”, “lush” or “botanical”, and you’ll have me at “green”! This fragrance oil has all of that, and instantly transports me to a spa-retreat in some secret, tranquil garden! A refreshing aromatic note, which reminded me of real cucumber water, caught my attention from the very first sniff, and the sheer “green-ness” of this scent had me instantly enamored! I knew I wanted to do something extra special and skin-pampering with the soap batch I’d be incorporating this fragrance oil into!
Now, keep in mind that “Aroma Therapy” fragrance oil does accelerate moderately in cold process soap, with some crafters experiencing very heavy acceleration with it in their recipes. That’s absolutely no problem though, and in fact, it’s actually perfect for the design we’ll be making with it! There are some soap designs which mild to moderate acceleration is actually an advantage, and in the case of moderate to heavy acceleration, layers are an excellent design-choice! In fact, layers love heavier acceleration because there’s usually little to no wait-time between pouring them, and one doesn’t usually need to be as careful to break the fall of subsequent layers with a spatula, since heavy acceleration causes previous layers to set up quickly once poured. This makes for a quick, fun and easy soap making experience, where you’re able to make as many layers as you’d like, in equally as many colors!
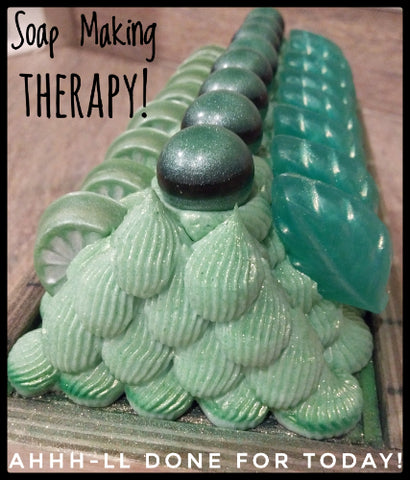
Since “Aroma Therapy” fragrance oil is so pristinely green, for this particular project, we’ll make three layers in three different shades of green (My favorite color EVER!). Each green mica was chosen for its soothing and tranquil hue, to match our aromatherapeutic theme, with a bold, black mica line between each one to create eye-catching contrast. To bump up the awesomeness-factor of this soapy project, each layer will feature a different natural exfoliant, with the bottom layer being deeply exfoliating; the middle layer containing a softer exfoliant, and the top layer containing the softest one.
For the bottom layer, I decided I’d incorporate finely-ground chia seeds. This will bring deeper exfoliation in the finished soap. If you don’t have chia seeds on-hand (or a way to grind them), they can be substituted for post-brewed coffee grounds or walnut shell powder. Since rougher exfoliants, like these, can be a bit scratchy or irritating to sensitive skin, it’s important to use less in one’s recipes (Less is more when it comes to these types of exfoliants!). For natural exfoliants like coffee grounds, ground chia seeds, walnut shell powder, etc., I’ve found that a usage rate of 1/2TBS/PPO (Per Pound of Oils) is plenty! This provides an effective amount of “scrubbiness” to one’s soaps, without being harsh, scratchy or irritating.
For the middle layer, I decided I’d incorporate colloidal oatmeal. Colloidal oatmeal is wonderfully skin-loving, and is a gentler exfoliant. However, added in excess, even colloidal oatmeal can be a bit irritating to some skin-types, so a great usage rate I recommend is 1TBS/PPO. For the top layer, I decided to go even gentler, and incorporate calendula petals. Calendula makes for an excellent additive in cold process soap! The petals are super mild on the skin, so even the most sensitive of skin-types can enjoy them. Not only do they add skin-loving goodness to one’s soapy creations, but they bring such lovely visual appeal too! Where other botanicals, such as rose petals or lavender buds, turn brown when incorporated in cold process soap, calendula petals don’t! They maintain their pretty golden-yellow color through saponification and cure, and look beautiful in soap! A great usage rate for calendula in cold process soap is 2 to 3TBS/PPO.

With my soap’s design all planned and ready to go, the first order of business was to make some melt & pour embeds. I wanted to add green soap frosting to the top of this soapy project (sans exfoliation), so naturally, I decided I’d adorn the top with some decorative embellishments too! As always, this part of the project is 100% optional, but if you’d like to add soap frosting and embeds to the top of your own soap batch at home, feel free to use any of the ideas shared here!
Using Life of The Party brand molds, I made what would be cucumber slices, as well as some fresh-looking leaves. The “cucumber slices” I made were actually citrus slices, but with a little imagination and some “Winter White” mica, they became cucumber slices! I used equal parts “Celadon Green” and “Winter White” micas to color the embeds themselves, then dry-painted them with a little “Winter White” mica. For the leaf embeds, “Sea Green” mica was used, followed by dry-painting a light accent of “High Society” mica on each one, to create a beautiful golden-green sheen. For the ball embeds, I used Nurture Soap’s Small 9-Ball Silicone Mold, and colored them in “Laurel Green” and “Nocturnal” micas. If you’d like to create these embeds at home, all you need to do is pour a small amount of Nurture Soap’s Low Sweat Soap Base, colored in “Laurel Green” mica, into each cavity. Allow this to set up, then pour a little more soap base over top of that, colored in “Nocturnal” mica. Once this layer has set, fill up each cavity the rest of the way, using more soap base colored in “Laurel Green” mica.

For the soap’s three-layer design, I chose “Laurel Green” and “Sea Green” micas, as well as a blend of “Celadon Green” and “Winter White” micas, at equal parts. “Nocturnal” mica would be used to create those bold, black mica lines between each layer. The bottom layer of this soap design would be colored in “Laurel Green” mica, and would be the layer containing ground chia seeds. The middle layer would be colored in “Sea Green” mica, and have colloidal oatmeal incorporated into it; and the top layer would be colored in equal parts “Celadon Green” and “Winter White” micas, with calendula petals added. As I waited for my batch oils and lye solutions to cool down to room temperature, I dispersed my lovely greens in a bit of batch oils.

PEACEFUL PORTIONS
Once my batch oils and lye solution had cooled to room temperature, it was time to get this project underway! As a personal preference, I enjoy soaping cool anyway (Between 76 to 82 degrees Fahrenheit), but when working with fragrances which accelerate, either moderately or heavily, soaping cool will allow you more time to work, as it’s heat which can cause your soap batter to thicken faster. Since “Aroma Therapy” fragrance oil is a fast-mover in cold process soap, the best way to have a stress-free soap making experience with it is to get your whole batch prepared and ready to go first, then stir the fragrance oil in by hand last, one layer at a time, and immediately before pouring each one.
With this in mind, the first step to creating this project’s layered design is to use your immersion blender to bring your soap batter to just past emulsion, or a very light trace. Next, divide your total batter into three equal portions. To the first portion, add the ground chia seeds, then pulse this a few times with your immersion blender to get it nice and incorporated. Repeat this with the other two soap portions, mixing the colloidal oatmeal into one, and the calendula petals into the other.

Once you’ve added all that naturally-exfoliating goodness to each portion of your soap, you can now add the mica colorants! If you’ve dispersed your micas in a bit of carrier or batch oils, you can choose to stir the micas into each portion by hand, or use your immersion blender. When using your immersion blender to incorporate the colors, just be careful not to over-blend your soap batter. You’ll want to keep the soap batter at a light trace when you hand-stir the fragrance oil in. A few, short pulses with your immersion blender is all that’s needed.

LAYERS AT YOUR LEISURE!
Now, I know what you might be thinking, because I’ve totally thought it too! Just the very thought of making a batch of soap with a heavily accelerating fragrance oil is enough to give any soap maker the chills! Every horror story we’ve ever heard or read becomes a vivid picture in our mind’s eye... Situations like “soap on a stick”, smashing and mashing that lumpy brick of soap batter into your mold, pulling out your crockpot in a frantic attempt to save what will inevitably turn out being a not-so-pretty batch of soap (No such thing as “ugly” soap in my world!), banging the ever-living daylights out of your mold on the countertop, hosting a funeral for your trusty immersion blender because it didn’t make it, or having an entire batch of perfectly good oils and butters go to waste. It’s an absolute shame and a nightmare all at the same time, and it’s thoughts like these that are anything but peaceful! In fact, working with a fragrance oil which causes considerable mischief can be downright stressful!
For this project, however, I promise that you can take every single one of those stressful scenarios and throw them right out the window! Why’s that, you ask? Well, it’s because none of those things are going to happen with this batch of soap! We’re going to make a gorgeously green, multi-colored batch of scrubby soap, and from beginning to end, layer-by-layer, it’s going to be a stress-free, pleasant experience! Let’s begin with that first layer!
At this point, we’ve separated our soap batter into three equal portions, and have incorporated those lovely exfoliants and mica colors into each one. From here, we’ll separate “Aroma Therapy” fragrance oil into three equal portions as well. Taking one portion of fragrance oil, go ahead and add it to the “Laurel Green”/chia seed portion of soap batter, then quickly give it a good stir (by hand) until it’s fully combined. As soon as the fragrance oil is incorporated into the soap batter, take the entire portion and pour it directly into your mold. Beautiful!

The next step will be to create that bold mica line! Using one of Nurture Soap’s incredibly handy Glitter Spray Pumps, or a fine-mesh tea strainer, go ahead and give the top of that first layer a good dusting of “Nocturnal” mica. I know I’ve mentioned this in a previous blog post, but here are some of my best tips for creating the best mica lines in your soap designs: First, always use a mica with a smaller micron size. Smaller micron sizes produce the best mica lines, with less chance of the layers separating. The larger the micron size, the higher the risk of separation. Second, make sure to create a nice, even dusting of mica across the surface of the soap. Don’t dust the outer edges of the soap as thickly as the center, as this could also cause your layers to separate. Third, when finished with your mica line, spray it ever-so-generously with rubbing alcohol. This causes the mica to become a coating over the top of the soap. Why is a good thing? Well, for one, it will greatly reduce any chances of the layers separating. The next layer of soap poured over top of it will literally bond to it, rather than just sit on top of dry powder. Generously spraying each mica line with rubbing alcohol will also eliminate any smearing when the soap is cut (I don’t have to turn the loaf on its side.). It will make the mica lines in your soap bars appear thicker and bolder, and will also prevent the lines from becoming smudged or transferred to fingers when touched. There is literally no way you can go wrong with spraying your mica lines with rubbing alcohol!

From here on out, this exceptionally relaxing soap project becomes a harmonious cycle of “wash, rinse, repeat”! Taking your second, “Sea Green”/colloidal oatmeal portion of soap, quickly stir the next portion of “Aroma Therapy” fragrance oil into it, then gently pour it over the first layer. While making this soap design, I was delighted to find that the first layer had set up so nicely, and quickly, I didn’t need to be as careful when pouring the next layer. I still used a spatula to break the soap batter’s fall, and keep it from disrupting the mica line beneath it, but there was absolutely no worry of subsequent layers breaking through previous ones, which is a definite bonus in my book! Once you’ve poured that second layer, follow it up with another mica line, and another generous spritzing of rubbing alcohol.


The last, and final layer will be the one colored with equal parts “Celadon Green” and “Winter White” micas, which also contains those pretty calendula petals! If you’d prefer to skip piping the top of your soap with soap frosting, I would suggest omitting the final mica line. Instead, using the back of a spoon to create a textured top would look positively charming! As a suggestion, you could even add an attractive mica drizzle on top, using a bit of “Nocturnal” mica in oil. If you would like to add soap frosting to the top of your soap batch though, go ahead and make that last mica line after you’ve poured the last layer.


THAT LOVING TOUCH!
Continuing on with the project, I whipped up a batch of soap frosting and piped the top of the loaf in another sensational green mica... “High Society” mica’s amazing versatility in cold process soap makes it one of my absolute most favorite micas in the whole world! Depending on usage rate, one can create the softest shade of elegant turquoise, all the way to a stunning and intense shade of emerald! It’s a FABULOUS mica! This is what “High Society” looks like in cold process soap at just 1/2tsp/PPO... Isn’t it gorgeous?

To add to the fantastic freshness of this classy color, as well as the soap’s toe-curling aroma, an ethereal dusting of “Shamrock Gold” Enviroglitter added that perfect loving touch! Once finished with the soap frosting portion of the project, I gently placed the melt & pour embeds on top, insulated the batch under a towel-draped cardboard box, and chalked the day up to a soapy success! With everything going on lately, I really needed a “mini mental vacay”, and so far, this crafty creation had been exactly what the doctor ordered!
I honestly didn’t think “Aroma Therapy” fragrance oil could smell any GREENER until I cut the batch the next morning! Out of the bottle, this fragrance oil smells fantastically fresh, clean, botanical and spa-like. It’s the perfect scent to take all your cares away! In cold process soap though, HOLY GREEN GOODNESS! Let’s just say that if you positively hate the smell of all things living and green, you might want to steer clear of “Aroma Therapy” fragrance oil, as it’s the epitome of all things lush, dewy and ALIVE! If the scent of the great, green outdoors speaks to your very soul though, then by all means, allow me to introduce you to my new love!

THERAPEUTIC SOAP MAKING: FINDING PEACE IN THE (COLD) PROCESS!
“Aroma Therapy” fragrance oil behaved beautifully for this soap design, and truly was a therapeutic soap making experience! There was no rushing, no beating to submission, no cursing, no ruined soap batches; just an easy-going, harmonious crafting encounter, which made for a beautiful batch of soap! I felt like “Aroma Therapy” and I understood each other; and in understanding how to best utilize this fragrance oil in an artistic way, I was able to take advantage of its “shortcomings” and rename them “advantages”! This is true for almost any fragrance oil which has been labeled a “bad performer”. Admittedly, for the longest time, I actually dismissed the thought of ever purchasing this fragrance oil because of the bad rap it had received. Its reputation preceded itself, and as a result, I missed out on a really great scent. As time went on though, it was precisely this fragrance oil’s reputation which prompted me to buy it. Falling in love with it was just an added bonus!
I have never known Nurture Soap to carry a fragrance oil that didn’t set the bar for the highest quality, so I needed to know for myself what made this particular fragrance oil different. What I found surprised me in the best of ways! I didn’t find a new fragrance to add to my “naughty list”, I found one that was perfect for this project! Is this a fragrance oil I’d recommend for a Taiwan-swirl, butterfly-swirl or 10-color drop-swirl? Most certainly not. BUT... Is this a fragrance oil I’d recommend for straight layers, tilted layers, uneven layers, layers with mica lines, single-color designs, natural exfoliants, or even a simple landscape design? YOU BET’CHA!
So, in the spirit of this soapy theme, and finding your own source of inner peace amongst the mayhem, I offer to you, my amazing fellow crafters, a challenge! This coming week, as you go about your soapy business, I would like to extend to you an opportunity for growth! Seek out one thing you would normally avoid, and run wild with it! In other words, find your personal “mayhem” and make peace with it! Whether that be a misbehaving fragrance oil (or a discoloring one), a fragrance oil you always just assumed you wouldn’t care for, different soap making colorants, or even a technique or design you’ve avoided because it seemed difficult. When you’ve completed that one thing, come back and leave a comment below... I’d love to read about your experiences! HAPPY “NOTHING VENTURED NOTHING GAINED” SOAP MAKING, MY INCREDIBLE CRAFTY COLLEAGUES!

MAKE THIS RECIPE!
- Lye @ 5% Superfat
- Distilled Water OR Aloe Juice @ 33.33% Lye Concentration (2:1/Liquid: Lye)
- 40% Olive Oil
- 30% Coconut Oil
- 10% Castor Oil
- 10% Cocoa Butter (Deodorized)
- 10% Shea Butter
- 6% “Aroma Therapy” Fragrance Oil
- 3% Sodium Lactate (Optional. Added to cooled lye solution.)
- 3% Hydrolyzed Oat Protein (Optional. Added to cooled lye solution.)
- 1/2TBS White Kaolin Clay (Optional. Blended into fragrance oil.)
- 2-3TBS/PPO Calendula Petals
- 1TBS/PPO Colloidal Oatmeal
- 1/2TBS/PPO Ground Chia Seeds (Can be substituted for coffee grounds or walnut shell powder.)
- 1TSP/PPO: “Laurel Green” Mica, “Sea Green” Mica, “Celadon Green” + “Winter White” Micas (1:1)
- “Nocturnal” Mica (For mica lines.)
SOAP FROSTING RECIPE:
- Lye @ 5% Superfat
- Distilled Water @ 33.33% Lye Concentration (2:1/Water: Lye)
- 40% Olive Oil
- 30% Coconut Oil
- 10% Castor Oil
- 10% Cocoa Butter (Deodorized)
- 10% Shea Butter
- “High Society” Mica @ 1/2TSP/PPO
- “Shamrock Gold” Enviroglitter (Dusted on top.)
- Melt & Pour 7/8” Ball Embeds in “Laurel Green” & “Nocturnal” Micas
- Melt & Pour Leaf Embeds in “Sea Green” Mica (Dry-painted with “High Society” mica.)
- Melt & Pour Cucumber Slice Embeds in “Celadon Green” + “Winter White” Micas (1:1/ Dry-painted with “Winter White” mica.)
- ATECO #172 Piping Tip