Deck The Halls With Crafty Projects
Thanksgiving has come and gone, and as we officially kick off another glorious holiday season (and attempt to come up with different and clever ways to finish off the leftover turkey), nothing says “holiday spirit” quite like home-crafting! Whether it’s making a beautiful wreath to adorn your door, hand-painting ceramic ornaments with the kiddos, decorating the tree with family, or making a holiday-themed batch of soap, the joy of the season is given life through these creative and oh-so nostalgic projects!
For me, the true meaning of the holidays is rummaging through that old, dusty box of decorations, coming across that one, special ornament, and allowing it to take you on a trip down memory lane; reliving the happy moments associated with it from so very long ago. It’s making grandma’s famous gingerbread cookie recipe and finding they still tickle your taste buds the very same way they did when you were a kid (even though you can’t quite seem to make them nearly as pretty as grandma did). It’s the long overdue embrace from a loved-one who’s returned home for the holidays, or the joyous sounds of family members gathered around the table, lightheartedly squabbling over past stories each one remembers slightly different (was it Josh who went streaking through the snow or Bobby?). Most notably, it’s the smells associated with the season. There isn’t anything that can instantly induce a feeling, or take you back to a moment in time, quite like a scent can! And that’s precisely why the very first time I smelled Nurture Soap’s “Comfort & Joy” fragrance oil, I knew a holiday-themed cold process soap project was in order!

Jingle All The Way Down Memory Lane
This particular project had a few different inspirations, actually. The first came when, as previously mentioned, I smelled “Comfort & Joy” fragrance oil for the first time, and fell head-over-heels in love with it! This is the most deliciously cozy, spiced apple cider scent to have ever graced my nose (well, next to real apple cider, which is precisely what it smells like)! It immediately brought me back to my days of living in Connecticut, when the apple orchards would open their proverbial doors to the public, and one could grab a basket and pick apples right from the tree.
Many of these orchards had their own, little country stores where you could purchase all types of homemade goodies, from apple butter to pickled garlic, various jams and jellies, pies, apple cider and so much more! My absolute favorite experience was always the hot, homemade apple cider they’d often offer patrons as they entered the shop. The moment I smelled “Comfort & Joy” fragrance oil, that specific memory came flooding back to me so clearly, it’s like I could almost taste it again! Freshly-made, hot apple cider with a positively perfect dash of cozy cinnamon and spice… That’s what you’ll find in “Comfort & Joy” fragrance oil. It’s a scent that would be especially loved throughout the entirety of Fall and Winter (not strictly for the holidays alone), as it’s a heavenly aroma perfect for warming the soul anytime the weather outside turns a little crisp (or downright frightful)!

My other inspirations for this project included my brand-new 2.5lb. Basic Tall Skinny Mold, and Nurture Soap’s newest red sensation, “Trial by Fire” Mica/Pigment. I thoroughly adore my new Tall Skinny mold (a birthday gift from my husband, whom I mercilessly hounded for, despite the fact he simply couldn’t understand why I’d choose a soap mold over clothing, a new handbag, or jewelry- silly man!). I love how beautifully the bars from this mold fit so perfectly in the palm of my hand, and being the proud owner of several Nurture Soap molds, I can definitively proclaim that these are the absolute best molds I’ve ever worked with!
“Trial by Fire” mica/pigment was another inspiration for this project, as the moment I received it, I was itching to get it into a batch of soap! Admittedly, from the jar, it does look a bit on the dark fuchsia side, but years of using Nurture Soap’s mica colorants in my soapy projects has taught me to trust their expertise impeccably. If Nurture Soap says this is a true red’s red in application, I believe it without hesitation. I just had to see it for myself though, and getting this exciting, new color into a batch of soap was a must!
Oh Holy Embeds
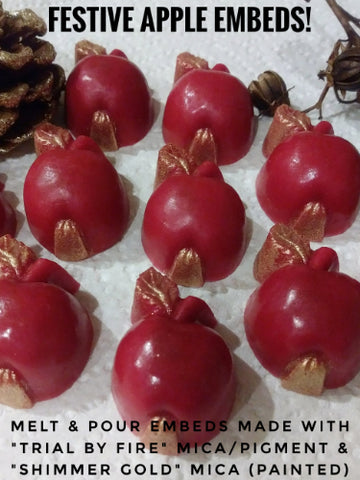
With my inspirations guiding me, I planned my design and chose other festively cozy mica colors. First thing was to get started on the melt & pour embeds which would adorn the top of my soap. Naturally, I went with apple embeds to go with the apple-cidery theme of the project, and decided that nothing other than “Trial by Fire” mica/pigment would be more perfect for them.
Using Nurture Soap’s Low Sweat Clear Soap Base (the only base to use for melt & pour embeds in this soap maker’s most sincere opinion), I weighed out what I’d need to make my first two embeds (my mold only has two cavities) and melted it down. Using one of my super convenient .15CC Mini Scoops, I added “Trial by Fire” to the base and stirred. HOLY WOW! The transformation this mica/pigment underwent the moment I combined it with the melt & pour soap base was simply jaw-dropping! Not only was incorporating this colorant completely effortless, but I witnessed the truest, most stunning red appear right before my very eyes! I hadn’t even gotten it into cold process soap yet, and it was already settled: I LOVED THIS RED!

I made ten gorgeously red apple embeds in total, and decided these beauties needed one more festive touch. I grabbed my beloved jar of “Shimmer Gold” mica and decided a little mica-painting was in order. Highlighting small details on the embeds themselves is quick and easy, and can really add eye-catching appeal!

To dry-paint melt & pour embeds, simply take a soft-bristle paintbrush, dip it into a jar of mica, tap the excess mica off the brush, then paint it directly onto your melt & pour embed. It’s simple, but looks so pretty! The mica will stick to the melt & pour soap, but will wash away the first time the soap gets wet. It’s purely for aesthetics, but oh what lovely aesthetics they are! With my apple embeds complete and looking wonderfully festive, it was time to turn my soapy-holiday vision into a soapy-holiday reality!
I’m Dreaming Of A Colorful Soap
For this project of pure comfort and unabashed joy, I chose a combination of mica colors which I felt best depicted how this deliciously heartwarming fragrance oil, “Comfort and Joy”, made me feel. Of course, “Trial by Fire” mica/pigment was a definite “in”, and I decided to pair it with Nurture Soap’s beautiful “Alpine Green”, “Fire Cider”, “Brick Dust” and “Maya Gold” micas as well. This color theme perfectly conveyed the pictures in my mind’s eye of walking through apple orchards so long ago, sipping hot cider as I leisurely strolled through quaint country shops and perused all the wonderful handmade goods. Admiring each oil-dispersed color, I could feel those very same feelings I did way back then. With the colors and fragrance oil capturing a wonderful moment in time, I was happy to be reliving it through the creativity of soapmaking!

May All Your Slurries Be White
I’d never worked with this scrumptious fragrance oil before, but being that it’s listed as a perfect performer in cold process soap, I decided on a colorful tiger swirl design, complete with a pretty piped-top. Because I wanted to gift the soaps to family and friends for the holiday, I also opted for a steep liquid discount to hopefully help speed along curing time. As I weighed out the fragrance oil for both my main batch and soap frosting, I also incorporated one of my favorite additives, white kaolin clay.
Not only is kaolin clay generally well received by all skin types, it’s also skin-loving, and I simply adore the way my soaps feel when I use it. Another added bonus is that it’s a wonderfully inexpensive way to help one’s fragrances be as long-lasting and potent in soap batches as they possibly can be! It’s a great scent fixative, and whether or not a fragrance actually needs it (which I’ve found most Nurture Soap fragrances don’t!), I add it to each and every fragrance oil I work with.
I make what’s referred to as a “kaolin clay slurry”, and you can do this 24 hours prior to making your soap batch if you’d like (the more time the clay has to soak up the fragrance oil, the better). I generally add anywhere from one generous teaspoon, up to one generous tablespoon of clay per every ounce of fragrance oil I’ll be using in my recipe… There’s really no right or wrong amount, It’s all personal preference. I add the clay directly to the fragrance oil, then mix it well with my mini-mixer. That’s all there is to it, and you’d incorporate your kaolin clay slurry in the very same way you’d incorporate any fragrance into your soap. Kaolin clay is heavier than fragrance oils, so when making slurries in advance, you’ll notice that the clay will eventually settle back down to the bottom, Periodically returning to give the slurry a quick mix with your mini-mixer (just whenever it crosses your mind), will redistribute the clay within the fragrance oil.
One of my favorite little tools for incorporating any additive to my cold process soap recipes is Nurture Soap’s 4 Way Measuring Spoon. I own two and love them! Less dishes to wash means more time making soap, and with the 4 Way Measuring spoon, you get four spoons in one! On one side, you’ve got your tablespoon and teaspoon measurements. Flip it over and you’ve got your half and quarter teaspoon measurements! It’s worth its weight in gold in my opinion!

Oh What Fun It Is To Make Soap
It was time to delve into the heart of this holiday project, so I got busy making soap! I divided my batter into 5 equal portions and incorporated my colors.

They looked every bit as vibrant and beautiful in the actual soap as they did when dispersed in a bit of carrier oil. The absolute star of the show was “Trial by Fire” mica/pigment! The moment I stirred it into my cold process soap batter, I was happily seeing red! As with my melt & pour soap base, it blended in with incredible ease, and the pure integrity of this red was unwavering, bold, and true! As red as the day is long, the results were positively stunning! I’d like to take a moment to give a standing ovation to this magnificent color! If ever there were a game-changer for micas, “Trial by Fire” mica/pigment is absolutely IT! Needless to say, Carrie Thornsbury ROCKED IT with this red, and it lived up to everything I hoped it would be!

As I began my tiger swirl pour, my workspace smelled incredible. I was lost in nostalgic bliss, and the fragrance oil behaved beautifully! Near the end of pouring, my batter did thicken a bit, but I blame this entirely on my steep liquid discount, and by no means was the thickening unmanageable. I just picked up my pace a little, but at no time did I feel rushed. As I finished pouring, I took a bamboo skewer to the top and did a quick swirl, for no other reason than for the pure joy of it! The colors in application looked delightfully comforting together, and I was feeling that holiday spirit, loud and strong!

The Top Is Brightly Shining
My holiday soap project was moving along beautifully, so it was time to whip up some soap frosting and get the top piped! I used my favorite white colorant, “Winter White” mica, and cheerfully went to work designing a billowy, snow-white piped top for my merry creation. Nothing could’ve made this project look more jovial and brighter than a healthy dusting of “Gold Dust” EnviroGlitter. By the time I was finished, the whole loaf glistened and gleamed with the radiance of a thousand twinkling lights!

It was time for the finishing touches, and as I carefully adorned the top of my soap frosting with each ravishing-red apple embed, I added one final sprinkling of “Gold Dust” EnviroGlitter to the embeds themselves. As it fell like snow atop each one, the joy and spirit of the season came to soapy life! A quick spritz of rubbing alcohol, and this holiday beauty was ready to be insulated and put to bed for the night!

The Cut is So Delightful
The next morning couldn’t have come sooner! All the previous night, it wasn’t visions of sugar plums dancing in my head, it was dreams of cozy, spiced cider and barrels of juicy, red apples! My soap unmolded with ease from my Tall Skinny mold, and it was time to get this batch cut!
I had one final embellishment I wanted to incorporate with this project… One last finishing touch that would take this holiday creation from cheerful to full-on festive! I lovingly cut my batch of soap, trimmed up the edges a bit, then grabbed some more melt & pour soap base. I wanted to adorn the face of each bar with an acorn embed, so using “Alpine Green” mica, I quickly made ten charming, little acorns, and once again, added a pop of detail by mica-painting their cupules with more “Shimmer Gold” mica.

The best way I’ve personally found to attach melt and pour soap pieces to the face of cold process soap is by using good ol’ fashioned distilled water. Melt & pour soap, even when melted down and used as “glue”, just doesn’t want to stick to cold process soap for the long haul. By attaching the pieces with distilled water, as the soaps cure, the two soap pieces form an inseparable bond.
It’s important to attach freshly-made melt and pour embeds to freshly-cut cold process soap though, as it’s the excess liquid within the soap that forms that super-strong bond between the two different types of soap. As the soaps dry and cure, the bond becomes ever stronger, so that the melt & pour embeds stay firmly attached, and won’t pop off the cold process soap bar.
To do this, first ensure that each melt & pour embed will sit completely flush against the face of the cold process soap bar. If it doesn’t sit flush, simply take a small trimming tool or non-serrated knife, and carefully shave down the back and/or sides of the melt & pour soap piece until it does. Take a small cup filled with a bit of distilled water, and a soft-bristle paintbrush, then generously apply the water to the backside of the melt & pour embed. Don’t be afraid to get it completely and thoroughly wet. Next, take your brush and also apply a small amount of water to the face of the cold process soap bar, but only to the area where you’ll be affixing the embed. Position the embed onto the cold process soap bar. It’ll slip and slide around a little bit, giving you time to position it exactly where you want it. Using your thumbs, press down on the embed firmly for a good 15 to 20 seconds, until it will stay in place on its own.
Lastly, take a cotton swab and gently swipe around the edges of the melt & pour soap piece to remove any excess water that may have gotten pushed out from underneath the embed. At this point, I know it may be tempting to test the adherence of the melt & pour soap piece to the cold process bar to make sure it’s really on there, but at all costs, resist this temptation! You need that bond between the two soap pieces to start forming, so resist touching the embed for at least 24 hours. After that, you can fiddle and futz with it if you’d like!
Let It Glow, Let It Glow, Let It Glow
I lovingly attached each melt & pour acorn embed to the face of each bar, then stood back for a moment to inspect the finished look. I was so pleased with the results! The colors came together beautifully, with “Trial by Fire” mica/pigment being an absolute show-stopper! The tall and skinny shape of the bars looked perfectly adorable for this project, and the scent (Oh that glorious scent!) accentuated and defined this magical creation of holiday-soap goodness!

God Rest Ye Merry Soap Makers
As we navigate through this busy, and oftentimes hectic, holiday season, remember to take little moments of quiet reflection and nostalgic recollection too! Make time for yourself to do and thoroughly enjoy the activities you love. Revel in moments of rest and relaxation, surround yourself with loved-ones and laughter. Equally as important, get crafty too! We are soapy artists, each with our very own magnificent and unique talents and gifts. By tapping into those wonderful talents and gifts, we also tap into the true meaning of the season! Happy holidays my amazing fellow soap artists, and happy crafting too!
