
WHICH CAME FIRST? THE RESIN OR THE FRAGRANCE OIL?
Ah-ha! Finally, one of those age-old “Which came first?” questions I can definitively answer without getting into a long, thought-provoking debate... It was the fragrance oil! When I first purchased Nurture Soap’s “The Devil’s Door” fragrance oil, it was love at first sniff! To my nose, the scent is warm, rich and sensual, with a complexity that doesn’t overwhelm the senses; it makes love to them! Carrying aromatic notes of vetiver, opoponax, beeswax, ambrette and cumin, I was immediately smitten with the scent, but admittedly, had absolutely no clue what “opoponax” was! Heck, I didn’t know if what I was smelling even had a detectable note of it; I just knew I loved the aroma!
As with anything I’m unfamiliar with though, not knowing what exactly opoponax was began eating away at me! I’m just one of those oddballs who MUST self-educate until I feel I am properly knowledgeable in those things which interest, yet elude me. After all, I had seen this funny word several times before, and always in context or relation to something prized for its aroma. There was no way my addiction to amazing smells was going to let this one go! A simple Google search opened my eyes to what opoponax actually is...
Opoponax (Or opopanax, with an “a”. Either spelling is correct.) is a gum resin, which is commonly referred to as “sweet myrrh”. Today, it’s mainly used in perfumery, as its prized for its warm-balsamic, sweet, honey-like aroma. It’s been widely enjoyed since Biblical times, and ancient Romans used it as incense in their temples. Like frankincense and myrrh, opoponax is a natural oleo-gum-resin, sourced from the Burseraceae plant family, which are trees and shrubs native to regions of Somalia, Ethiopia, Kenya, etc. Currently, Somalia is the largest exporter of opoponax resin.
Suddenly the light bulb flickered on in my head! Of course, I was familiar with resins such as dragon’s blood, myrrh and frankincense; opoponax just so happened to be one I wasn’t familiar with. It was settled then, I had to get my hands on some, and I had to get some into a batch of soap, using “The Devil’s Door” fragrance oil!
REAQUIANTING WITH RESINS!
Before I get too excited here and start jumping ahead of myself, let’s stop and take a little breather first. Everyone at least 6 feet away from each other? Good! Okay, let’s all take a nice, deep, relaxing breath (Because I think we could ALL use one right about now!) and talk about resins for a moment! So, what exactly are resins? Resins come from that gooey, super-sticky sap produced by trees and plants. Resins are prized for many different purposes and uses, but most commonly for their scent, perfumery, incense-making and natural dyes. Many enjoy them for personal ritual purposes, and even in the healing of minor wounds.
When it comes to soap making, resins are appealing and useful in that they contain natural sugars, enzymes and minerals, which are naturally antibacterial. They also impart an absolutely lovely scent to one’s handcrafted creations! Alone, when incorporated as an infusion, their natural aromas in soap are mild, but oh-so beautifully present. Combined with the right fragrance or essential oil, they can absolutely sing in soap!
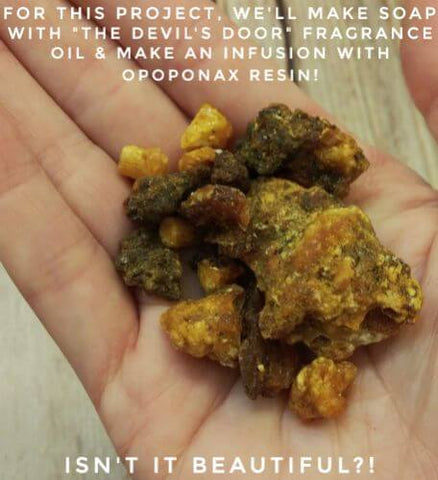
For this week’s soapy project, I had a pretty good feeling that I most definitely wanted to infuse opoponax resin into my recipe, and pair it with the ever exquisite “The Devil’s Door” fragrance oil, but I wanted to keep my options open too (Just in case!). I was lucky to find a company right here in Fort Meyers, Florida called World Incense Store that had a little bit of everything I needed, plus some things I wanted! I grabbed some opoponax, dragon’s blood, frankincense, myrrh, copal and benzoin resins, and got to sniffing!

Any of these gorgeous resins would make for a fabulous infusion in which to incorporate into cold process soap, but the moment I smelled pure opoponax resin for the first time, I knew it was the perfect choice for “The Devil’s Door” fragrance oil! Yes, “The Devil’s Door” absolutely does carry a fascinating presence of opoponax in its aromatic blend! To my nose, opoponax resin is smokey-sweet, earthy-rich and balsamic (I was going to say “resinous”, but that's sort of a given!). When ground, its aroma only amplified, producing another aromatic quality that reminded me of anise! I was so excited to get this resin infused and incorporated into a batch of soap, and even more excited to bring you all along with me!
HOW TO INFUSE RESINS!
The very first step to incorporating resins into your cold process soap recipes is to get that resin ground into a fine powder. Some resins, like benzoin, are softer, and can be broken into smaller pieces just by using your fingers. Unfortunately, opoponax resin isn’t one of those... It’s HARD! I found the best way to grind it was by way of mortar and pestle, but even then, I had to exert some “elbow grease”! If you find yourself having difficulty grinding the resin, don’t sweat it too much... The absolute last thing I want is for anyone to throw out a shoulder! Just do the best you can to get it ground into as fine of a powder as you physically can. If some larger pieces remain, that’s okay! Be sure to wear safety glasses when grinding the resin though... Some of those larger pieces can go airborne when they break apart!

How much resin you’ll want to incorporate into your soap recipe is entirely up to you, but for me, once I’d ground just a touch over a half ounce of opoponax resin into a fine powder, I asked my hands if that was good, and they confirmed that was a great amount! My tired, but happy hands emptied their hard work into a canning jar. When grinding your own resins at home, you’ll want to use a canning jar, or some other heat-safe container to collect your powder, as we’ll be using heat to make this infusion.

Once you’ve ground your resin to as fine of a powder as you possibly can, and have then poured it into a heat-safe container, you’ll then want to pour a carrier oil directly over top of the powder and stir well to combine. How much carrier oil and what kind? Again, this is personal preference, but I personally found that 2 ounces of carrier oil (I used olive oil.) over my half ounce of pure resin powder (a 4:1 ratio) was an excellent amount. Any carrier oil you prefer will do! You can use olive oil, sunflower oil, sweet almond oil, grapeseed oil... Whatever your heart desires!

The next step is to place your oil/resin mixture in a water bath. A crockpot is preferred, where water is added to fill it up about 2 to 3 inches from the bottom. If you don’t have access to a crockpot though, a pot placed over low heat on your stovetop will work just fine. Just be sure to add at least 2 to 3 inches of water to the bottom of the pot, and keep that heat low so the water doesn’t boil. Now, you’ll have to excuse my picture here... After searching high and low (And knowing I would NEVER throw it away!), I blamed the fact that I couldn’t find the lid to my Mason jar on my always-reorganizing husband (Poor guy!), and had to make do with plastic wrap instead! In a normal universe though, you will want to place the actual lid that was made for your jar or container on top, then set the whole thing into the water bath.

The very last step (For now, anyway!) is to place the lid on top of your crockpot or pot (set to “Low”), then set a timer for no less than 4 hours. I infused my oil/resin for a total of 5 hours, but a timeframe of 4 to 6 hours is ideal; after which, you’ll carefully remove your infusion from its water bath using hand mitts or pot holders (To protect your hands from burns.), then allow it to cool before straining. Once cooled, you’ll want to use a fine-mesh tea strainer or coffee filter to strain your infusion well, as resin powder can be a bit abrasive, and even a little tacky on the skin. Oh! And if you’re wondering why my crockpot looks like 1974 called and wants its crockpot back, it’s because 1974 DID call! I’m just not giving it back, because it’s still going strong!

At last, my resin/oil infusion was complete and it smelled INCREDIBLE! Once cooled, I strained the oil from the ground resin, then weighed it to ensure I had 2 ounces. This part is important because for this specific recipe, this is what we’ll be using as our superfat. Yep, that’s right... For this recipe, we’ll be adding the superfat later, so when plugged into soapcalc, I set the superfat for this recipe at 0%. This doesn’t mean the recipe isn’t going to be superfatted, it just means that I wanted to incorporate the recipe’s superfat myself, by way of the oil/resin infusion. To do this, I’ll incorporate the full amount of the resin-infused oil after I’ve already brought my soap batter to trace, and more specifically, this resin-infused oil is what I’ll be using to disperse my mica colorants with. Now, keep in mind, lye is not discerning. It will bond with the very first oil/fat molecule it comes across (There’s a funny analogy here, but I’ll keep this blog G-Rated, and not make it!), and the process of saponification doesn’t happen instantaneously. So, while there is no way to guarantee that the full amount of my resin-infused oil will make up 100% of my recipe’s superfat, I like to think that it at least gives it a fighting chance if I add the recipe’s chosen superfat after the saponification process has been initiated. In any case, adding two extra ounces of oil to this 32oz recipe will ultimately give us a superfat of approximately 6.3%.

THE DEVIL’S RECIPE!
Now that we’ve made our resin infusion, and it’s ready to rock in a batch of handmade soap, let’s quickly talk about the recipe! “The Devil’s Door” fragrance oil smells so downright sexy, I actually formulated this recipe with my husband in mind. He’s one of those jealousy-inducing individuals who suffers from absolutely no skin ailments or conditions whatsoever (Like, NONE! It’s ridiculously unfair!). The man has COMPLETELY NORMAL SKIN (Ugh!), so he’s even able to use the soaps I make for shaving, and his face always feels as soft as a baby’s bottom (I know, it disgusts me too!). It ain’t right, but despite my ongoing jealousy, I tweaked my usual “go-to” recipe for his benefit (A soap with lots of lather, yet mild and conditioning enough for him to use on his face too.). Here’s what we’re looking at...
In this recipe, we’ll use coconut oil for its abundant lather and cleansing properties. Castor oil will stabilize those big, fluffy bubbles produced by the coconut oil, while shea and cocoa butters will be incorporated for the mild, stabilizing, lotion-like lather they produce, as well as their skin-conditioning properties. Olive oil will be incorporated for its mildness and moisturizing properties, and remember, we’ll be adding even more olive oil to this recipe by way of our resin-infusion. This will help to counteract any dryness coconut oil’s cleansing properties may impart (Although, my husband doesn’t suffer from dry skin. THE NERVE OF HIM!). Part of the olive oil in this recipe will be substituted with rice bran oil. Rice bran oil imparts medium lather in soap formulations, and has mild cleansing properties. It also tends to impart a pretty “sheen” to the bars themselves.
Rice bran oil can be substituted for part of your recipe’s olive oil, at a recommended usage rate of 5-12%. If you don’t have any rice bran oil on hand though, worry not! Here are some other fantastic, skin-loving oils that can be substituted for part of your recipe’s olive oil at the same recommended usage rate (5-12%): Sweet almond oil, safflower oil, grapeseed oil, sunflower oil or avocado oil. If none of these oils are available to you, you can always just use the full amount of olive oil in your recipe. There are other adjustments you can make to a recipe during times when you might not have a certain oil or butter readily available to you which a recipe calls for. For example, the cocoa butter in this recipe can be omitted, with shea butter being used up to 20%. If neither cocoa or shea butters are available to you, these butters can be substituted for lard, tallow or palm oil.
Just be sure to always run your recipe through a lye calculator whenever making any changes, adjustments or substitutions to it. A golden rule for tailoring any recipe to include oils or butters you have readily available to you: Substitute your hard oils for hard oils (Those oils/fats/butters which are solid at room temperature.), and your soft oils for soft oils (Those oils/fats which are liquid at room temperature). During these unfortunate times, it might be difficult to find all the supplies you need, but soap making is a wonderful way to relieve stress! If you follow this advice, you’ll be able to make wonderful batches of handmade soap with any oil or butter you have handy!
KNOCK KNOCK KNOCKIN’ ON THE DEVIL’S DOOR!
Now that I’ve got Guns N’ Roses stuck in your head (Much better than “Baby Shark”. Once you get that tune stuck in your head, it’s in there- FOR GOOD!), let’s get rollin’ by making a rockin’ batch of resin soap, using the sensational “The Devil’s Door” fragrance oil! Since I wanted to add the resin-infused olive oil to the recipe as our superfat, and I always disperse my mica colorants in a bit of carrier oil anyway, I decided to kill two birds with one stone (preverbally speaking, of course! I love birds and would NEVER throw rocks at them!), and disperse the micas in the resin-infused oil. I wanted the colors for this soap to be rich, deep and mysterious. Nothing was more fitting for this than Nurture Soap’s “Nocturnal”, “Ruby Red”, “Black Pearl”, “Neutral Gray” and “Winter White” micas! Not only did this color theme look rich, deep and mysterious, but after mixing them with the resin-infused oil, they smelled that way too!

For the design of this project, a gorgeously fluid drop-swirl looked lovely in my mind’s eye, and using Nurture Soap’s 2.5lb Basic Tall Skinny Mold to create tall, rectangular, door-shaped bars of soap seemed positively perfect! Blending until I reached a light trace, I split my soap batter into four 8oz portions, then colored the remaining soap batter in “Winter White” mica. To my 8oz portions, “Ruby Red”, “Nocturnal”, “Neutral Gray” and “Black Pearl” micas were added. Since each of the micas were dispersed in the resin-infused olive oil, I was mindful of getting every last drop of oil into each portion of soap.

Alternating colors as I poured a fluid drop swirl, I filled my Tall Skinny mold to the very top. “The Devil’s Door” fragrance oil behaved so spot-on perfect, from the beginning of pour to the very end of it, I really couldn’t have imagined a better behaving fragrance oil if I tried! Something so incredibly magical happened to this fragrance oil as soon as it was introduced to the opoponax resin infusion though! I can’t even fully describe it, other than to say- you really have to smell it to believe it! Its notes have become richer, deeper and a touch smokier. A sweet, resinous, woody-earthy complexity has deepened within the blend in a way I could have never anticipated. The aroma is positively enchanted! The fragrance oil itself remained so fluid and workable while pouring the batch, I had to wait a while for remaining soap batter to thicken up a bit, but once it did, I spooned every last drop of it on top of the loaf, then used the back of that spoon to create some soft texture.

For finishing touches, I dispersed a little “Ruby Red” mica in oil, then drizzled it on top of the soap. Using the back of my spoon, I incorporated this mica drizzle into my textured top, then gave the whole loaf a generous dusting of “Red Enigma” mica. If you’d like to make this project at home, you can choose to stop right here, or create a sort of “crackle” effect, that I’ve always thought looked really cool! To create that crackled look, just spray the loaf (rather generously) with rubbing alcohol, after you’ve completed the mica drizzle and have dusted “Red Enigma” mica on top. You’ll literally be able to watch as the top of your soap forms a crackled effect (as shown here) with each generous spritzing of rubbing alcohol!

ADHEREING MELT & POUR EMBEDS TO COLD PROCESS SOAP
If you’ve read any of my previous guest blog posts, you probably know by now that I never know when to leave well enough alone... This batch of soap was no exception! Once cut, the bars looked and smelled sensational, but I really wanted to drive the theme of this design home! Using Nurture Soap’s Low Sweat, Clear Soap Base and more “Ruby Red” mica, I used an embed mold in the shape of a Victorian-style keyhole plate to create some decorative embellishments which would complete the mysterious look of this soapy design!

Now, it’s understandable that not everyone reading this is going to think, “Oh sure Amber, let me just go grab my Victorian-style keyhole embed mold!”, so if you don’t have such an obscure mold, that’s completely no problem! For anyone interested, I did find it on Etsy, but anything that you wish to use will work just as beautifully! Heck, you could even use red hearts if you’d like! Just know that decorative embeds are completely optional, and will not make or break the fact that you are going to have one fantastic batch of soap, no matter what!
For those who do wish to place decorative embeds on the face of their soaps, the best way that I’ve personally found to adhere melt & pour embeds to the face of cold process soap bars is by making a distilled water/liquid soap mixture. For every tablespoon of distilled water, add 3 or 4 pumps of any kind of liquid hand soap to it, then stir really well to create a watery “glue” of sorts. Next, take your melt & pour embeds and a scraping tool, and shave down the backside of the embed to expose its “tacky” layer beneath (Freshly made melt & pour embeds work best.), as well as ensure the embed itself sits as flat and flush to the surface of your cold process soap bar as possible (Freshly cut cold process soap bars work best.).
Using a soft-bristle brush, thoroughly saturate the backside of the melt & pour embed with the water mixture, and place a dab of the water mixture on the cold process soap bar, where you’ll be placing the melt & pour embed. Lay the melt & pour embed down onto the face of your bar of soap and apply steady, even pressure. The embed is going to want to slip and slide around a bit, but eventually, you’ll be able to feel it begin to stay put! Apply firm and even pressure for 20 to 30 seconds, until the melt & pour embed will stay adhered to the face of your cold process soap bar all by itself. Next, take a cotton swab and gently clean up the edges of the embed where any excess water may have gotten pushed out from underneath. The very last step is to not even be tempted to touch that melt & pour embed for at least 24 hours! The two different types of soap need uninterrupted time to form a bond with each other. It’s the excess liquid in the soap that initially forms the bond, it’s curing time which makes them inseparable.

OPENING DOORS TO NEW POSSIBILITIES!
There you have it, my dear fellow crafters extraordinaire! We’ve made soap bars that look like the devil’s door (If there were such a thing, it certainly looks awesome!) using “The Devil’s Door” fragrance oil and an opoponax resin infusion! Resins, in general, weren’t necessarily new to me, but opoponax resin most certainly was, and I was pleasantly surprised to find I positively love it! So, what was it that I learned exactly? What valuable lesson did I take away from this that I can share with you, my equally valued crafting companions? Well, I’m happy you asked because a couple things come to mind, actually!
First, I learned that when something drives you absolutely batty because you don’t know what it is, don’t be afraid to dive in, educate yourself and possibly get your hands on some, if you can... UNLESS this thing is a Sea Wasp Box Jellyfish; in which case, read up on them (Because they’re fascinating!), but definitely DON’T get your hands anywhere near one! Second, I learned that making resin-infusions for the purpose of soap making doesn’t just make for a great batch of soap, but it’s really fun and easy too! When incorporated into soap recipes, resins smell wonderful all on their own, but when paired with a complimenting fragrance or essential oil, they can make your olfactory senses do a happy dance!
So, go for it; try something new! Even if incorporating resins in your soap recipes isn’t new to you, maybe try a different type of resin that you haven’t used before. You never know what will happen when you explore new things, but the best part is always yet to come when you do! In a best-case scenario, you’ll find yourself delighted with the results, and proud of your accomplishments. In a worst-case scenario, you will have still learned something new, and newfound knowledge is NEVER a bad thing! Go forth and get your “knowledge on”, my fellow soap making superstars!

MAKE THIS RECIPE (*Don’t forget to make your oil/resin infusion first!):
*THIS RECIPE IS FOR A 32OZ BATCH OF SOAP, MADE IN NURTURE SOAP’S 2.5LB TALL SKINNY MOLD. ANY ADJUSTMENTS MADE TO IT SHOULD BE RUN THROUGH A LYE CALCULATOR!
- Sodium Hydroxide (Lye) @ 0% Superfat (*Superfat to be added later.) = 4.75oz
- Distilled Water OR Aloe Juice @ 33.33% Lye Concentration (2:1/Liquid: Lye) = 9.50oz
- 30% Coconut Oil = 9.6oz
- 30% Olive Oil = 9.6oz
- 10% Castor Oil = 3.2oz
- 10% Cocoa Butter = 3.2oz
- 10% Rice Bran Oil = 3.2oz
- 10% Shea Butter = 3.2oz
- 6% “The Devil’s Door” Fragrance Oil = 1.92oz
- 1/2TBS/PPO White Kaolin Clay (*Optional. Mixed directly into fragrance oil.) = 1TBS
- 3% Sodium Lactate (*Optional. Added to cooled lye solution) = 0.96oz
- 3% Hydrolyzed Oat Protein (*Optional. Added to cooled lye solution) = 0.96oz
- 1oz/PPO Opoponax Resin/Oil Infusion (*Divided and used to disperse mica colorants. A 6.3% superfat, approximately.) = 2oz
- Mica Colorants @ 1tsp/PPO (*Dispersed in oil/resin infusion.): “Ruby Red” Mica, “Nocturnal” Mica, “Neutral Gray” Mica, “Black Pearl” Mica. “Winter White” Mica @ 1.5-2tsp/PPO.
- Mica Drizzle in “Ruby Red” Mica + Mica Dusting in “Red Enigma” Mica (*Optional. Added to the top of soap loaf, then generously sprayed with 91% rubbing alcohol.)
- 10 Qty: Decorative Melt & Pour Embeds in “Ruby Red” Mica (*Optional. Attached to the front of each bar of soap, cut at 1” thickness.)