
DELAYED REACTION
Back in July of 2019, I was doing what many other soap makers were likely doing as well... Summer was well underway, so it was time to start planning and creating my fall and winter collection of handmade soaps. Naturally, this had me perusing Nurture Soap’s website for some fabulously unique fragrance oils which would set my seasonal soaps apart. Fragrances like “Autumn Equinox”, “Jeweled Fir” and “Winter Wonderland” (Just to name a few... I absolutely adore these fragrance oils!), which would have me feeling warm, cozy and nostalgic inside, despite the fact it was still 97°F outside! I came across one fragrance oil in particular, and knew I had to have it! It was a custom fragrance, limited to the season, so there was no way I was going to miss out on snagging a bottle! That fragrance oil was called “Jack Frost”. With notes of almond, cocoa, orange flower, lime, benzoin and cognac listed in its description, it sounded positively delicious, and I couldn’t wait to add this one-of-a-kind aroma to my seasonal lineup!
As always, my order from Nurture Soap arrived in no time (Their lightening quick order processing times are so appreciated because I am one incredibly impatient soap maker!), and I was so excited to get to sniffing all the wonderful fragrances I’d purchased! When I got to “Jack Frost” fragrance oil though, I had two initial feelings about it: First was that it smelled delicious! I absolutely love citrus scents in general, but citrus scents with a twist of delightful complexity speak to my very soul! My second feeling was that of minor confusion, to be completely honest. The fragrance oil I was smelling was bright, refreshing and happy, with mouthwatering notes of sweet orange and cognac speaking loudest to me. It was definitely scrumptious, but wasn’t an aroma that screamed “Holidays!” to me. New Year’s Eve “bubbly” perhaps, but chilly autumn days, or snowy winter mornings... I just couldn’t place myself there when I smelled it. To me, it smelled more apt to being a year-round type of scent, with a bite of candy-like sweetness. My confusion led me to putting the pause button on incorporating this juicy-fresh aroma into my seasonal lineup of soaps, and I ended up storing it away in my fragrance oil cabinet. As to what to create with this uplifting fragrance oil, I was hopeful my inner artistic inspiration would eventually guide me.
Fast forward to just this past week... It’s been eight months now that this poor fragrance oil has been sitting in my fragrance oil cabinet, patiently waiting to become a glorious-smelling batch of soap. As usual, I found myself browsing through Nurture Soap’s website, and their outstanding collection of fragrance oils, when I came across what I initially thought was a new arrival. New fragrance oils perk me up faster than a triple shot of espresso, so I didn’t hesitate to investigate further! Turns out, “Jack Frost” fragrance oil was given a permanent spot in Nurture Soap’s lineup of exceptional fragrances, and given a new name too! “Smell the Rainbow” was its new name, and it was given this name due to comments reviewers had made about this particular fragrance oil resembling the scent of Skittles candies (or “Ski-TELLS”, for all you Trale Lewous fans out there!). How exciting! It only took me eight months, but suddenly my imagination was doing cartwheels, and inspiration was hitting hard!
With newfound creativity blossoming into excitement for this upbeat and fruity fragrance, for this week’s soapy project, I decided we’d make a batch of rainbow-inspired soap in classic “Amber” style! Rainbow-themed soap designs are some of my all-time favorite designs to make, and some of you may already be aware of just how much I love me a good ol’ fashioned hanger swirl design in soap! But that’s not all! If you’ve read any of my previous blog posts, you might’ve noticed that I’ve mentioned using tussah silk in my cold process soap recipes before, but I’ve never really delved deeper into exactly how or why I occasionally incorporate it. For this crafty creation, I thought it would be fun to go step-by-step into the creative process of making a beautiful rainbow-colored soap design together, as well as get into the “nitty-gritty” of how to incorporate tussah silk into your cold process soap batches too. So, settle in for a fun and color-packed read, and let’s get to making some “Silk Rainbow” handmade soap!

THE “TEA” ON TUSSAH!
When it comes to concocting this colorful creation, the first order of bubbly business is to get some decorative melt & pour embeds made. Keep in mind that this is entirely optional. The batch of soap made for this specific project features a piped-top with soap frosting, along with some melt & pour embellishments, but you can absolutely omit the piped-top and/or melt & pour embeds if you wish. If you’d like to include the soap frosting and decorative embeds though, you’ll want to get those made first.
Because “Smell the Rainbow” fragrance oil is such a bright and yummy scent (There really is a fruity, colorful, candy-like “vibe” going on within it!), I chose to make juicy strawberry embeds in the stunningly deep-pink shade of “Heart Breaker” mica; as well as tangy lemon wedges, using the gorgeously vibrant “Firefly” mica. To give the soaps some extra springtime “flair” (And pay a little respect to a certain leprechaun who’s always going on and on about charms and rainbows and such!), clover embeds were made in the lively and aptly named “Enchantment” mica! All the molds used to make these embeds were plastic Life of The Party brand chocolate molds, which can be found at local cake decorating supplies shops, as well as online retailers of bakery and candy making supplies. If you find them priced any higher than $2 per mold, don’t do it! At reputable retailers, they’re very inexpensive, and are available in literally hundreds of different designs! The melt and pour soap base used for this project was none other than Nurture Soap’s Low Sweat, Clear Soap Base because it’s awesome, and makes the best embeds for decorating cold process soap with, in this soap maker’s opinion!

Once the melt & pour embeds are complete, it’s time to suit up for safety and get that lye solution made (Two lye solutions if you’ll be making soap frosting as well.). This is where we’ll be incorporating the tussah silk! Before we jump into it though, let’s talk a little about tussah silk and why it’s a popular soap making additive. Tussah silk is kind of like honey in the sense that it’s not part of an actual insect, rather something made by an insect- a silkworm to be exact! I know the differences between mammals and insects don’t need to be explained, but in the same way that honey is considered an animal byproduct, so too is tussah silk. If it’s important to you that your soap recipes remain vegan-friendly, hydrolyzed oat protein can be used in place of tussah silk. Add it to your cooled lye solution (120°F or cooler) at a usage rate of 1% - 5% (I prefer 3%, but you can add more or less, as desired.).
Tussah silk is produced from several different species of silkworms belonging to the moth genus Antheraea. The silkworm creates a cocoon in which to metamorphose into a moth, and it’s these cocoons which are harvested to create tussah silk. Some processes of harvesting the cocoons include leaving them out in the sun to dry before boiling them to soften the silk fibers, or placing the cocoons directly into boiling water. With either method, the poor silkworm inside is killed during the process, and this is mainly for aesthetic purposes. It prevents the silk fibers from being broken, as they would become if the moths were allowed to emerge from their cocoons prior to harvesting them.
Thankfully, more individuals than ever before are becoming increasingly vocal about animal cruelty, and avoiding products which aren’t cruelty-free. There’s another harvesting process which allows the larvae to live, and includes harvesting and boiling the cocoons only after the moths have emerged and no longer need their silky homes. This type of tussah silk is also known as “non-violent silk” or “Ahimsa silk”, and is prized for being humanely harvested and cruelty-free. If using only humanely harvested, cruelty-free tussah silk in your handmade soaps is very important to you, the supplier from which you buy your silk should be able to tell you if the silk they carry meets these standards. If such claims are already made and it would mean a lot to you to see proof of that, any reputable supplier will also be able to provide manufacturer documentation of those claims at your polite request... After all, we live in such a magnificent, yet fragile eco-system, and silkworms are important to it too!
But why even add silk to one’s soap recipes in the first place? Well, exactly as it sounds is what it does! Adding tussah silk to your soap recipes will impart a soft, silky, luxurious feel to your soaps. Many soap makers feel it contributes to a more “slippery” feel as well, and also gives the bars a slightly shinier appearance. What’s more, the amount of tussah silk needed for a batch of soap is minimal, so it’s a great way to add some extra luxury and marketing appeal to one’s soapy creations at very little cost. Now that we’ve covered the “what’s” and “why’s” of tussah silk, let’s get started on making our silky lye solution!
A SILKY SOLUTION!
Incorporating tussah silk into your cold process soap recipes begins by making your lye solution. There’s a few tips and tricks I’ve learned along the way which make this process very easy and virtually effortless! First, we’ll start with exactly how much to use. Used in such small amounts, tussah silk would be practically impossible for the home crafter to weigh, so instead, it’s done by volume, and even that’s a guesstimate! For a batch consisting of 32oz of batch oils though, I’ve found that just a pinch does the job beautifully! When I make my tussah silk lye solutions for soap batches containing 32oz of oils, a pinch of silk about half the size of a regular cotton ball works great. When in doubt, follow the “rule of thumbnail” (Literally!): Per every pound of batch oils, grab a pinch of silk about the size of your thumbnail.

The next step is to pull those silk fibers apart as much as possible. In the very same way that lye is poured down a clogged drain to dissolve away accumulated gunk and hair, the process remains the same here. The lye must dissolve every fiber of silk, so to speed that process along, it helps if you keep your fibers small, cutting longer strands with scissors if needed, and pulling them apart as much as you possibly can. Pull the tussah silk fibers apart over the container that you’ll be weighing your liquid in, so that they fall to the bottom of that container, in preparation for the next step!

Next is to do what you normally would with any other batch of soap... It’s time to get your distilled water, or liquid of choice, weighed out. For this project, I used aloe juice, but any liquid you prefer to use is absolutely fine! Pour your liquid directly on top of the tussah silk fibers as you weigh it out, so that the silk becomes nice and saturated. If you see any dry strands of silk still floating around, just use a utensil to poke it on down into your liquid. Having the silk fibers fully saturated before incorporating the lye will also help them to dissolve a little faster.

The next step is to incorporate the lye, and you’ll do this in the very same way that you’d normally add lye to liquid; only this time, you’re adding it to silk fibers too. The only difference is that you’ll need to stir your lye solution a bit longer than usual. Normally when you incorporate your lye into your liquid, you stir until the lye has completely dissolved. Silk fibers take a little bit longer though, and you’ll want to make sure that those are fully and completely dissolved as well. This can require a little extra patience, so what I personally like to do is stir for about a minute or so, then take a break to go work on something else while the silk fibers continue to break down within the lye solution. After a few minutes have passed, I’ll return to the lye solution and resume stirring it for about another minute or two. I’ll continue doing this until all the silk fibers have fully dissolved within my lye solution. On average, it takes about five to eight minutes for my silk fibers to fully dissolve within my lye solution.


So, you’ve stirred and you’ve stirred and you’ve stirred, and now every single silk fiber has completely dissolved within your lye solution- now what? Well, now you can continue on with your soapy project, same as usual! Of course, you’ll want to get that lye solution cooled down (I like to start making my soap batches when both my oils and lye solution have reached anywhere between room temperature and 80°F.), then incorporate said silky lye solution into your batch oils in the same manner that you normally would with any other batch of soap. If you’ve never worked with tussah silk before though, you might have some questions still, so let’s quickly address the most common ones...

The most common questions I’ve personally received when it comes to making soap with tussah silk are: Do I need to strain my lye? Can tussah silk make my soap batter accelerate? Will tussah silk make my soap “mushy”, or require it to stay in the mold longer? Here are my answers, which are strictly based off of personal experience (I’ve been using silk in my soap recipes for a little over three years now), and are not founded on any kind of scientific fact whatsoever! Do you need to strain your lye? You absolutely can if you’d like to, but I don’t. I’m just one of those “If it isn’t broke, why fix it?” kind of soap makers, I guess! Sometimes tussah silk can cause a slight, foam-like “film” to form on top of your lye solution, and some soap makers prefer to strain this off. If that’s you, that’s absolutely A-Okay! There’s not that many “rights” and “wrongs” when it comes to soap making, so whatever feels right to you is best! For me, I’ve tried it both ways and haven’t noticed a difference in my soaps either way, so I just prefer not to add any extra steps if I don’t have to!
Can tussah silk cause your soap batter to accelerate? Well, I mean, sometimes the soap gods just love throwing a random curveball every once in a while, so I can’t discount that anything is possible, but I will say that in the three years I’ve been incorporating it into my soap recipes (and countless soap batches made), I’ve never once experienced any kind of acceleration on account of tussah silk. So, for now, I’m going to stick with “nope”! Can tussah silk make your soap “mushy”, or require it to stay in the mold longer? While I have heard rumors that incorporating too much silk into one’s recipes can cause this to happen, I’ve personally never experienced it. I use sodium lactate at 3% in my soap recipes as well, so my batches set up fairly quickly anyway, and unmold with ease within 8 to 12 hours after pour. I’ve never once had a batch of soap require an excessive amount of time in the mold because of tussah silk, so again, all good there!
With all the bases of tussah silk covered (That I can possibly think of at least!); what it is, where it comes from, how to incorporate it into your cold process soap batches, and my personal experiences working with it; let’s dive deeper into the fun and get to making some rainbow soap, shall we? It’s time to talk colors!
IT’S BEGINNING TO LOOK A LOT LIKE RAINBOWS!
What’s a rainbow-inspired soap without some fabulous colors, am I right? If there’s one thing Nurture Soap will never have a shortage of, it’s fabulous colors! For this project, it wasn’t hard choosing some phenomenally vibrant micas with which to create amazing swirls of rainbow-esque shades! With seven colors in total, I got busy dispersing “Winter White”, “Heart Breaker”, “Orange Marmalade”, “Lemon Drop”, “Enchantment”, “Kashmir” and “Jam Session” micas in a bit of olive oil. They looked every bit as bright and energetic as “Smell the Rainbow” fragrance oil, well... Smelled!

As soon as my lye solution and batch oils had cooled down to room temperature, I happily proceeded by stick blending my soap batter to a beautifully fluid, light trace, then split the batch in half. One half of the batch was colored in “Winter White” mica, while the other half was split again, into six smaller, but equal, portions. I then incorporated all those stunning mica colors into each smaller portion of soap, and hand-stirred “Smell the Rainbow” fragrance oil into each one as well. If rainbows truly do have a scent (I mean, other than ozone!), this is so totally what they smell like! Let’s just say that this fragrance oil smells like how rainbows make me feel... If that makes any sense at all!

To begin pouring the design of this soap, I started by pouring about a third of my soap batter, colored in “Winter White” mica, into the mold. The idea was to pour a classic tiger swirl, down the center of the mold, pouring each color in a repeating pattern, then pulling a hanger tool through it to create big swirls of bold colors. As you can see in these pictures, “Smell the Rainbow” fragrance oil preformed beautifully in this recipe! Despite all those colors and a tediously repetitive pour, the soap batter remained wonderfully fluid and perfectly workable from start to finish, with no worry of ricing or acceleration!
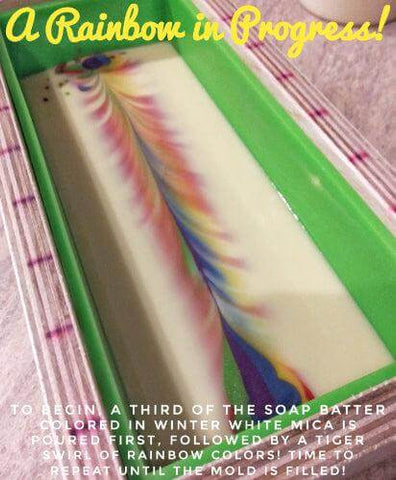

As soon as I completed pouring my colorful tiger swirl, I grabbed my trusty hanger tool and swirled-away to my heart’s content! Admittedly, the top of my soap looked a wee bit mottled and messy when I lifted the hanger tool out, but I was optimistically hopeful that when the loaf was cut, it would reveal a lovely array of rainbow-colored swirls inside!

I find it impossibly hard to describe the movement of a hanger tool whenever I create a swirly design within a batch of soap, and I’m always left wondering if what I just described made any sense as well! There’s been a couple times where a wonderful fellow crafter has reached out to me and asked how I created a specific swirl design within a batch of soap, and because that honors me so incredibly much, and I positively love my fellow soap-aholics, I whipped out my ruler and sharpie markers and drew it for you! This is a diagram of the hanger swirl I did in this batch of soap. Admittedly, I’m not very good at drawing (At all!), but hopefully this will give you a better idea of how I moved the hanger tool through the soap... Better than me describing it at least!

Once I completed my hanger swirl, I had just enough remaining soap batter to pour the rest on top of my loaf before moving on to blending up my batch of soap frosting. The remaining colors looked so delightfully tempting, I couldn’t pass up the opportunity to grab a bamboo skewer and add some more swirls to the top of my soap too! If you’d like to omit the piped-top of this project, this would be a fun and beautifully eye-catching way to finish up your batch of soap if you’d like! Just get every last drop of colorful soap batter poured on top, and start swirling away on your soapy canvas!

UP IN THE CLOUDS!
To finish up this project of candy-coated themes and rainbow-colored dreams, it was time to get my batch of soap frosting whipped up and ready to go! A soft, cheerful color to represent the sky seemed nice, and I knew of just the color to use. Nurture Soap’s “High Society” mica is quite possibly one of my all-time favorite micas ever because it isn’t just insanely pretty, it’s also incredibly versatile too! At any given usage rate, I can create the most opulent shade of emerald, all the way to the softest shade of turquoise! It’s a sensational color to have in one’s mica collection, and you don’t even want to get me started on how exquisite it looks in melt & pour soap base! For real though, if you haven’t tried this magnificent mica in your own crafty creations at home, you’re missing out... It really is a gem of a color (pun intended)!
For a fabulously frosted top, I decided to create a jaw-dropping shade of turquoise, by mixing “High Society” mica with equal parts “Winter White” mica. To make this blissful shade of turquoise “pop” even more, fine, shimmery mist of “Gold Dust” Enviroglitter looked downright mesmerizing! This, right here is one of my most favorite color combinations ever! Gold on turquoise... Be still my beating heart!

For the final finishing touches, the fun and fruity melt & pour embeds I made earlier looked as pretty as a picture when placed on top of the soap, and it was time to get this batch insulated for the night. I had a good feeling about this batch of “Silk Rainbow” soap... The fragrance oil formerly known as “Jack Frost” (Why am I getting “Purple Rain” stuck in my head?!) behaved positively perfect, and smelled just as it always did; happy and citrusy, with a hint of yummy sweetness and a splash of cognac. The only difference was that this time, I had known precisely what kind of soapy project I wanted to create with it. What’s in a name? In this case, everything!

FOLLOW THE SILK RAINBOW... AND YOUR HEART!
I positively loved every second of cutting this batch of soap! You know you love a fragrance when your husband points out that you’re smelling every single bar as you cut it, and you didn’t even realize you were doing that! Side note: I really hope I'm not the only soap maker who does that! I’ve even had family members say to me, “You’re smelling each soap as if the scent is somehow different from one bar to the next!”. My embarrassed reply is always the same: “I’m just savoring each and every piece!”. Honestly though, I don’t even know I’m doing it until someone calls me out on it... It’s my involuntary response to cutting soap. Pavlov’s dogs had bells to get them drooling; for me, it’s cutting a batch of soap!

I’m thrilled with how vibrant and colorful this batch of silky soap turned out! I’ll never grow tired of incorporating rainbow-colored swirls in my soapy designs, and to me, “Jack Frost” fragrance oil’s new name fits its character perfectly... I mean, if rainbows don’t smell like this, they wish they did! Creative inspiration usually comes fairly quickly for me, but I’m actually glad the creative inspiration for this project took a bit longer to find me! Many times, if I feel I’m in a creative rut, I’ll set the current project aside and just think on it for a while. In this particular case, it took eight months and a name change for inspiration to hit, but when it did, it hit hard! These are the soap making moments I love the most though; those moments when you’re thoroughly excited about the vision in your mind’s eye, and can’t wait to turn that vision into a real batch of soap! When it comes to this yummy aroma, I’m happy I followed my heart and waited for creative inspiration to find me. It’s much more difficult when artistic inspiration is forced. Wherever it might lead you, may you always follow your heart in your own sudsy adventures... That’s what makes for awesome batches of soap! Whether it’s overflowing with vivid colors and designs, or wholesomely pure and simple, that’s your art! You aren’t just another soap maker, and you never were! You’re a soap artist, and that artistry is manifested in every single batch of soap you make! Rock on, my fellow amazing soap artists!

SOAP RECIPE USED FOR THIS PROJECT:
- Lye @ 5% Superfat
- Aloe Juice @ 33.33% Lye Concentration (2:1/Liquid: Lye)
- 40% Olive Oil
- 30% Coconut Oil
- 10% Castor Oil
- 10% Cocoa Butter (Deodorized)
- 10% Shea Butter
- 6% “Smell the Rainbow” Fragrance Oil
- 3% Sodium Lactate (Added to Cooled Lye Solution)
- Pinch of Tussah Silk (Dissolved in Lye Solution)
- 1.5tsps/PPO Kaolin Clay (Mixed Directly into Fragrance Oil)
- 2tsps/PPO “Winter White” Mica
- 1tsp/PPO “Heart Breaker”, “Orange Marmalade”, “Lemon Drop”, “Enchantment”, “Kashmir” & “Jam Session” Micas
SOAP FROSTING RECIPE USED FOR THIS PROJECT:
- Lye @ 5% Superfat
- Distilled Water @ 33.33% Lye Concentration (2:1/Water: Lye)
- 40% Olive Oil
- 30% Coconut Oil
- 10% Castor Oil
- 10% Cocoa Butter (Deodorized)
- 10% Shea Butter
- 1tsp/PPO “High Society” & “Winter White” Micas (Mixed at Equal Parts)
- “Gold Dust” Enviroglitter (Dusted on Top)
- Strawberry Melt & Pour Embeds in “Heart Breaker” Mica
- Clover Melt & Pour Embeds in “Enchantment” Mica
- Citrus Wedge Melt & Pour Embeds in “Firefly Mica”
- Wilton #6B OR ATECO #866 Piping Tip